
The EWM inbound process ensures the efficient receipt of goods into a warehouse or distribution center.
One of the key components of the EWM inbound process is the inbound delivery document.
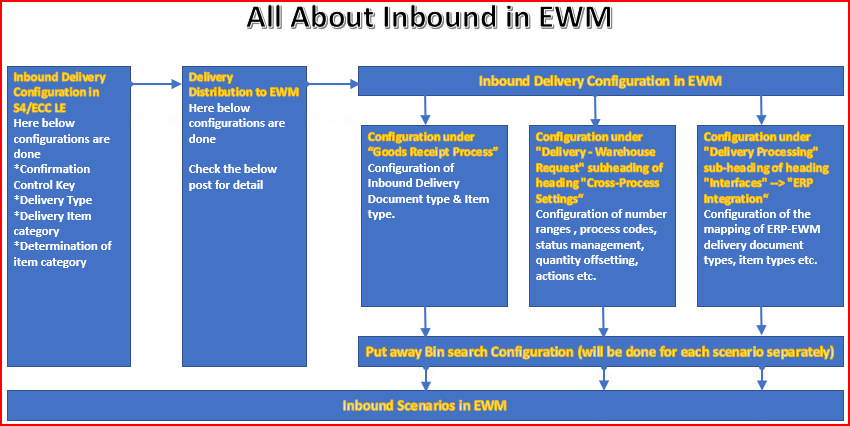
We will configure the below EWM inbound process components in this post
- First we will configure all the components of inbound delivery end to end.
- Then we will configure some practical inbound scenarios in EWM end to end. This is applicable for both S4 HANA embedded as well as decentralized EWM on S4 HANA.
🔍 Explore the Complete S/4HANA–EWM Integration Series
If you’re working with EWM processes like WPT, ST, LOSC, POSC, or warehouse execution, understanding how EWM connects with S/4HANA is essential. This 7‑part integration series explains the full technical flow, mapping logic, document integration, and real‑world configuration steps that every EWM consultant should know.
- Technical Connectivity Between S/4HANA & EWM
- ERP‑Side Settings for EWM Integration
- EWM‑Side Settings & Warehouse Setup
- Stock Type, Availability Group & Mapping Logic
- ERP → EWM Document Integration Flow
- Extra Steps for Decentralized EWM on S/4HANA
These posts will give you the complete picture of how EWM interacts with S/4HANA behind the scenes — a must‑have foundation for mastering any advanced EWM process.
1. Inbound Delivery in EWM
Inbound delivery document contains detailed information about the goods being received, including the quantity, weight, and dimensions. It also includes information about the source of the goods, such as the supplier or manufacturing location.
The inbound delivery is created in the LE components of S4/ERP system and is then sent to the EWM system.
Below diagram explains about the inbound in EWM
2. Configure inbound delivery in ECC/S4
To configure inbound delivery in the Logistics Execution part of the ECC or S4 HANA , below steps are executed.
- Step 1 -Confirmation Control key is configured -Check the below post to see the confirmation control key configuration in detail.
All About Purchase Orders in SAP MM-Confirmations
- Step 2 -Configuration of our car business inbound delivery “YEL” , item category “YELN” & determination of item category “YELN”- Please check the below post links to check detail step by step configuration.
Configure SAP S4 HANA Sales Documents in 10 Minutes-Inbound Delivery
With the above configuration completion, inbound delivery configuration in S4/ERP LE is completed.
3. Distribution of Inbound Delivery to EWM
Once inbound delivery configuration is completed in S4 HANA/ERP, it is then distributed to decentralized or embedded EWM
There are two components of distributing inbound delivery to EWM
3.1 EWM Relevancy of Storage Location
IN order to distribution the delivery to the EWM , Purchase order (PO) followed by inbound delivery should be created for a storage location which is connected with a EWM warehouse
Please note that Storage location in PO flows from the MRP-2 view of the material master.
Please check the below post foe detail
2 Minutes Guide to Create your First Material in S4 HANA
For our can business , below SLOCs are EWM relevant
- PP1D : EWM Rec. on Dock
- PP1S : EWM Available for Sale
- PPSA : Prod SLOC
Check the below post for detail
–> 2 Minutes Guide to Create your First Material in S4 HANA-Creating the material for S4 HANA EWM
3.2 Distribution of Delivery to EWM
We generate the distribution model to distribute the objects (Inbound deliveries, outbound deliveries, PMR etc.) from central SAP S/4HANA system to one or more SAP EWM systems by qRFC.
Please see the below post to check the distribution of delivery in detail.
--> Before configuring the distribution of inbound delivery to EWM, We need to complete the inbound delivery related configuration in the EWM as shown below
4. Inbound Delivery Configuration in EWM
There are three components of the inbound delivery configuration in EWM. We will configure each element step by step under each component.
4.1 Configuration under “Goods Receipt Process”
The path for this configuration is given below
Here we configure the components like – Configuration of Inbound Delivery Document type & Item Type, Configuration of document type & item type determination in inbound delivery etc.
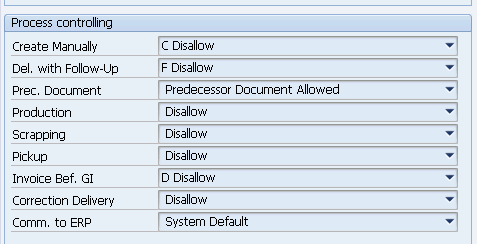
4.1.1 Define Document Types for Inbound Deliveries
In this configuration we will define the document type for Inbound deliveries.
SPRO –> SCM Extended Warehouse Management –> Extended Warehouse Management –> Goods Receipt Process –> Inbound Delivery –> Define Document Types for Inbound Delivery Process
We have configured below document types for our Inbound deliveries

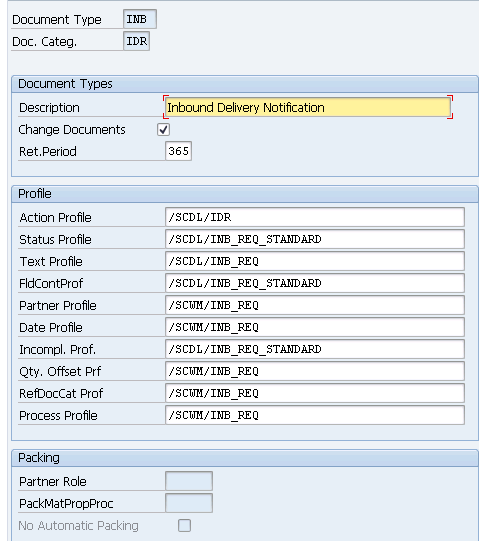
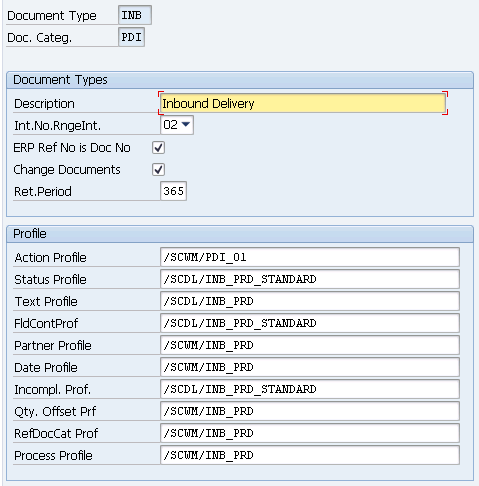
--> The checkbox "ERP Reference Number is Doc. Number" is used to have identical number for warehouse request same as LE delivery (reference document category ERP field - REFDOCNO , EWM field - DOCNO).

--> This field should not be set for Decentralized warehouse.
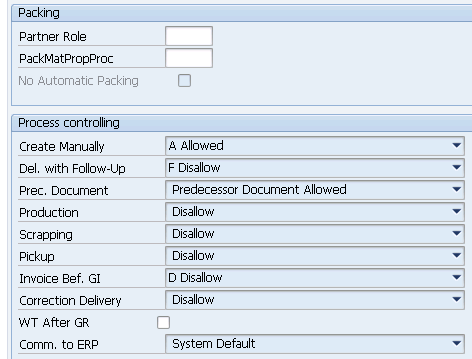
4.1.2 Document Type for Receipt from Production
In this section we will configure document types for finished products receipt from production.
There are two ways to receive the finished products from production
1)-Goods receipt posting triggered by SAP ERP.
2)-Goods receipt posting triggered by EWM.
We will look into the both ways one by one.
1)-Goods receipt posting triggered by SAP ERP
If goods receipt is triggered by confirmation of a production order, an inbound delivery of type INBI is created.
Activated BS set /SCWM/DLV_INBOUND_PROD to configure INBI document type in the system

Note: “GRP” Code for Initiator of a Communication Chain is used in this process
2)-Goods receipt posting triggered by EWM.
If we trigger goods receipt from EWM, then it helps to avoid duplicate inbound deliveries being generated for a manufacturing order
We activate this in configuration indicator GR From EWM Only
in SAP ERP.
Please check the below post to see the settings required
An Ultimate Guide for Initial S4 Settings to Configure EWM
Here an inbound delivery of type “INBM” is used. Activate BS set “/SCWM/DLV_INBOUND_PROD_DIR” to configure INBM document type in the system
After activating the BC set, INBM document type is not appearing in our inbound delivery document type list

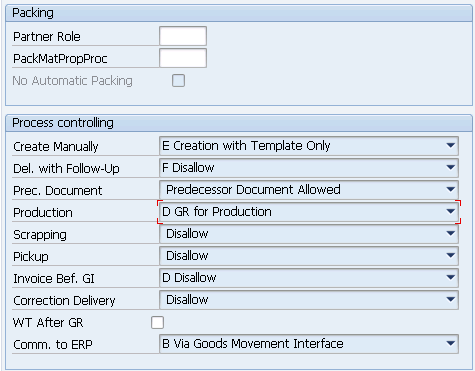
Note: “RNP” Code for Initiator of a Communication Chain is used in this process. These code for initiator of a Communication Chain are hardcoded in SAP
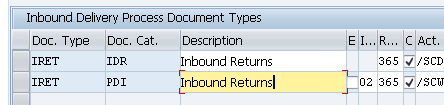
4.1.3 Document Type for Customer/STO Return Inbound
We will use SAP standard Document Type IRET here.
Activate BC set “/SCWM/DLV_INBOUND_RETURN” through SCPR20 if IORET is not present in your system.
4.1.4 Define Item Types for Inbound Deliveries
In this configuration we will define the Item type for Inbound deliveries.
SPRO –> SCM Extended Warehouse Management –> Extended Warehouse Management –> Goods Receipt Process –> Inbound Delivery –> Define Item Types for Inbound Delivery Process
We have configured below Item types for our Inbound deliveries
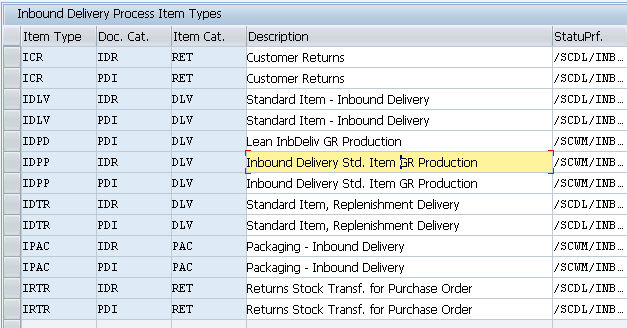
4.1.5 Item Type for Receipt from Production
In this section we will configure Item types for finished products receipt from production.
1)-Goods receipt posting triggered by SAP ERP
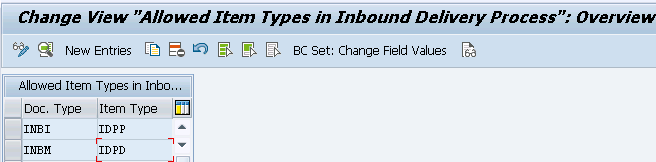
If goods receipt is triggered by confirmation of a production order, an inbound delivery of item type IDPP is created.

2)-Goods receipt posting triggered by EWM.
If we trigger goods receipt from EWM, an inbound delivery of item type IDPD is created.

4.1.6 Item Type for Customer/STO Return Inbound
We will use SAP standard Item Type IRET/IRTR here.
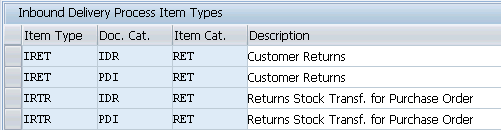
4.1.7 Define Allowed Item Types in Inbound Delivery Process
In this configuration we will define our inbound deliveries document types and corresponding item types to be used
4.1.8 Delivery Priority
We can define delivery priorities to control the delivery process. Through this we can give special treatment to some deliveries depending upon the business requirement.
4.2 Configuration under “Cross-Process Settings” –> “Delivery – Warehouse Request”.
Here we configure the components like number ranges , process codes, status management, quantity offsetting, actions etc.
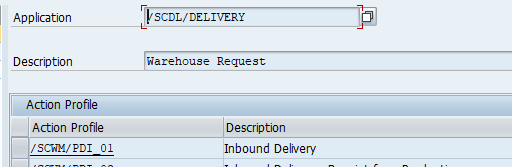
4.2.1 Define Action Profile
in S4 HANA Message control is done through Post Processing Framework (PPF).
The PPF generates actions from the data of an application as per action definition (Example-Print a delivery note) & process this action at a certain point in time.
So the actions must be created in an action profile for each document and item type.
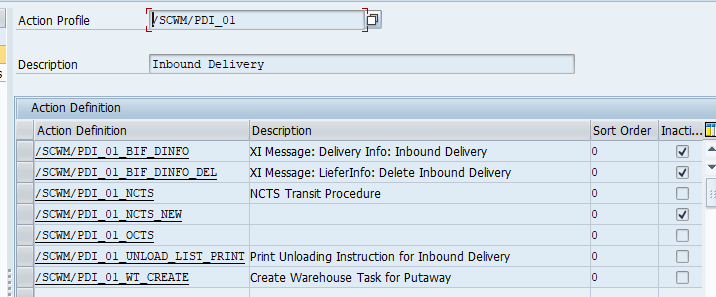
We have assigned Action profile /SCWM/PDI_01 to our IBD
SPRO –> SCM Extended Warehouse Management –> Extended Warehouse Management –> Cross-Process Settings –> Delivery – Warehouse Request –> Actions –> Change Actions and Conditions –> Define Action Profiles and Actions
below are the actions given under this action profile
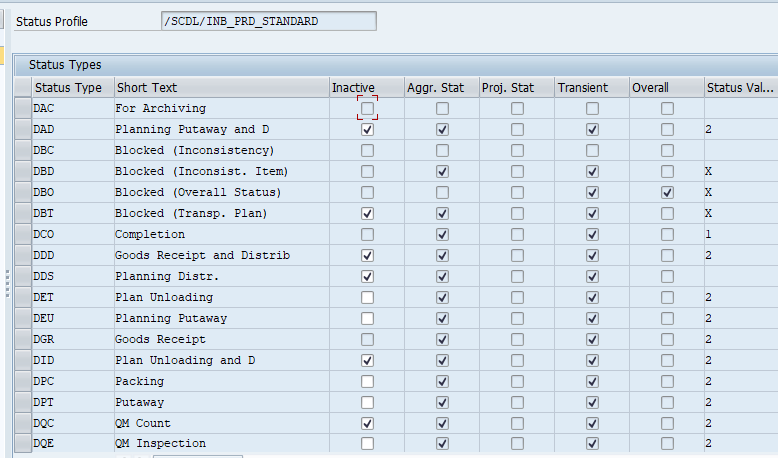
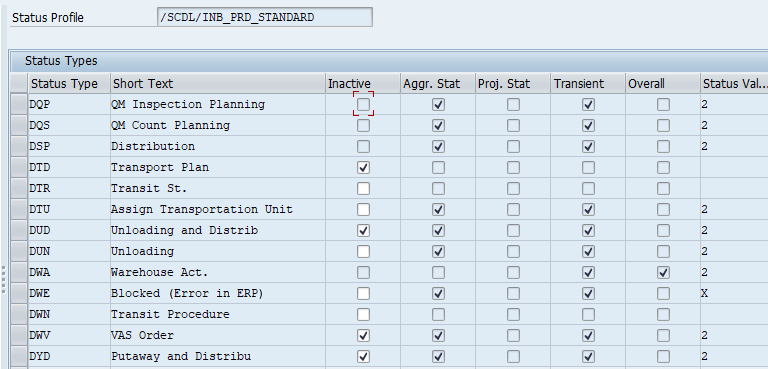
4.2.2 Define Status Profiles
In the configuration, we define the status profile for the document type & item type in delivery processing.
Each status profile is assigned to a system profile, which can not be changed. All status types that are not mandatory in the system profile can be omitted.
--> We can create additional status profiles for each system profile. When we do so, the system adds mandatory status types automatically.

--> Now we need to assign the new status profile to all relevant document types and item types in delivery processing

--> We can activate or deactivate non-mandatory status types
We have used /SCDL/INB_PRD_STANDARD status profile for our inbound Delivery
SPRO –> SCM Extended Warehouse Management –> Extended Warehouse Management –> Cross-Process Settings –> Delivery – Warehouse Request –> Status Management –> Define Status Profiles

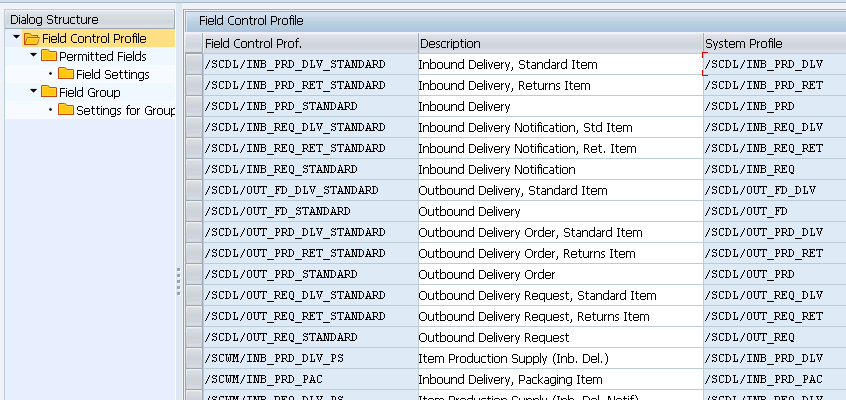
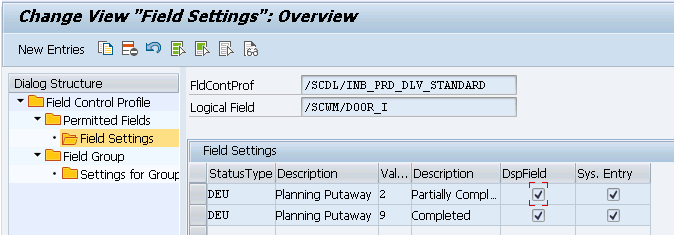
4.2.3 Define Field Control Profiles
Here we define the field control profiles for the delivery document type & item type.
Field control profile is assigned to a system profile from where it determines the assigned logical field name and its attributes.
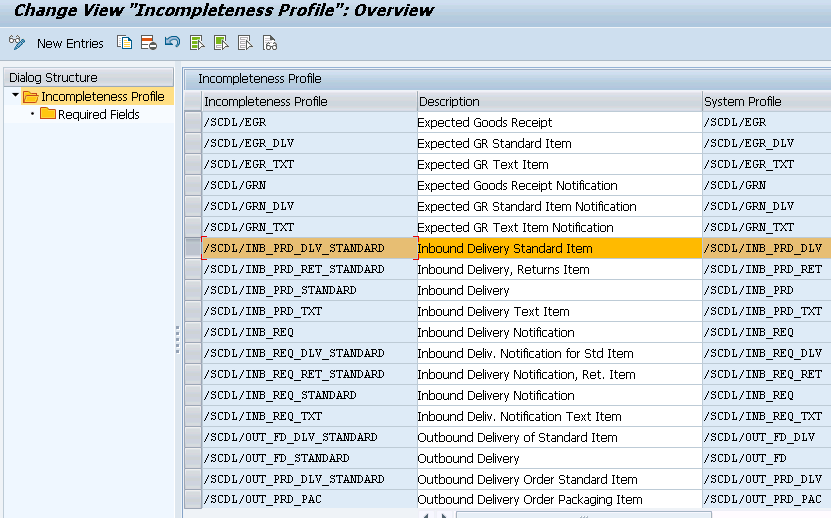
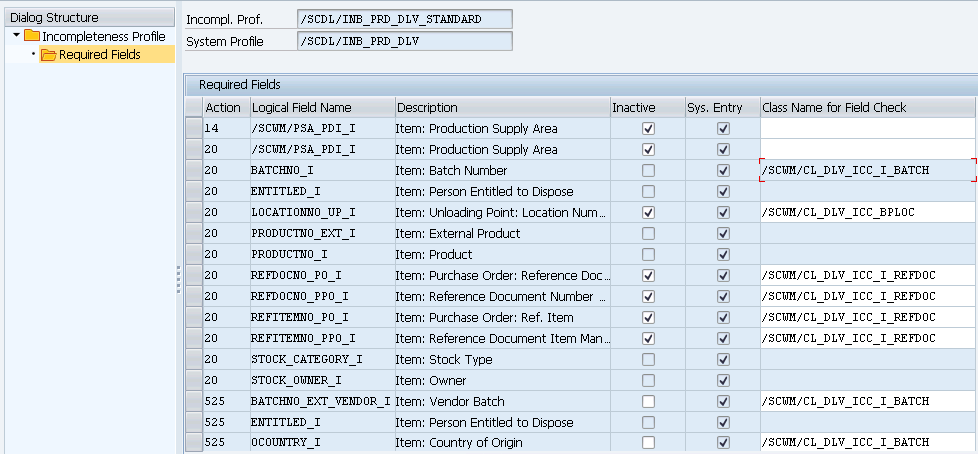
4.2.4 Define Incompleteness Profiles
Here we define the incompleteness profiles for the delivery document type & Item type.
Each incompleteness profile is assigned to a system profile for field control, from where checks if user wants to extend or restrict the system settings for the incompleteness check
4.2.5 Define Quantity Offsetting Profiles
Here we define the Quantity Offsetting Profiles for the delivery document type & item type.
Each quantity allocation profile is assigned to a system profile from where it takes the quantity roles, quantity determination rules and quantity offsetting rules from the corresponding system profile. If we want to change the quantity roles, quantity determination rules, and/or quantity offsetting rules for a business process, then we have to define a new quantity offsetting profile for a system profile here.
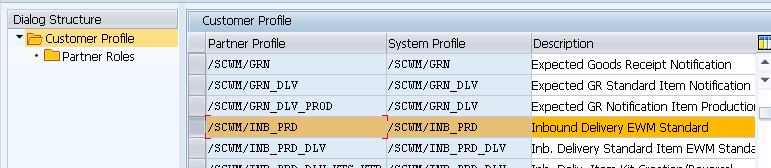
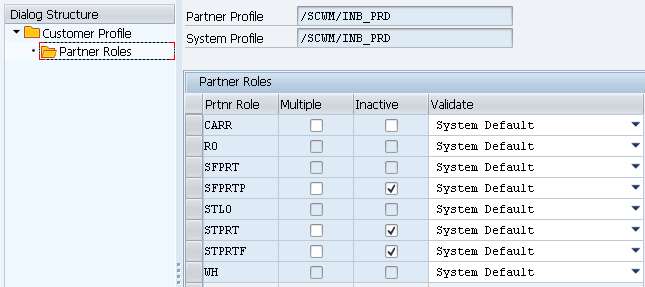
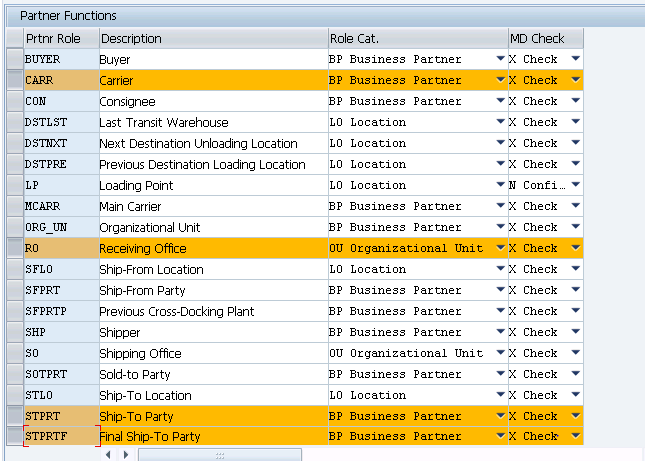
4.2.6 Define Partner Profiles
Here we define the Partner Profile for the delivery document type & item type. Each partner profile is assigned to a system profile from where it uses the settings for the assigned partner roles.
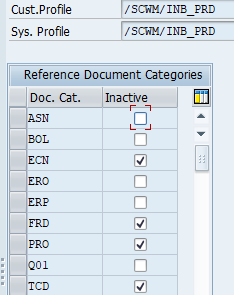
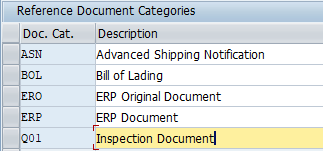
4.2.7 Define Reference Document Type Profiles
Here we define the Reference Document Type Profiles for the delivery document type & item type.
Each reference document category profile is assigned to a system profile from where assigned reference document categories are assigned.
We have used /SCWM/INB_PRD partner profile for our Inbound Delivery

4.2.8 Define Date Profiles
Here we define the Date Profiles for the delivery document type & item type.
Each date profile is assigned to a system profile from where it takes the standard date types. We can change to a new date profile with our own date profile.
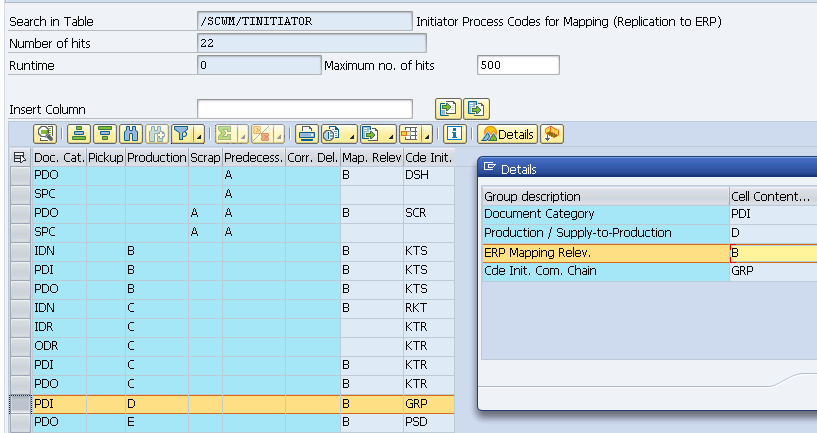
4.2.8 Define Process Profile for Document Header
Here we define the process profiles for the document types of warehouse request.
Every process profile is assigned to a system profile, from where characteristics of the process indicators for process management and control are assigned.
If we want to configure our own settings for certain process indicators for a business process we have to customize a new process profile.
We can check table /SCWM/TINITIATOR to check the validity of configuration as per document category
4.3 Configuration under “Interfaces” -> “ERP Integration” -> “Delivery Processing”.
Here we configure the mapping of ERP-EWM delivery document types, item types etc.
once we completes all the above configuration, we are ready to distribute our inbound delivery to EWM.
4.3.1 Define Number Ranges for LE Deliveries
This step is for the deliveries which originates from EWM system as a result of either original delivery creation in EWM system itself or through delivery split of the original delivery and distributing the same to LE.
In this case EWM system governs the delivery number.
Configure this number range as per below path
SPRO –> SCM Extended Warehouse Management –> Extended Warehouse Management –> Interfaces –> ERP Integration –> Delivery Processing –> Define Number Ranges for LE Deliveries

Please note that LE delivery document numbers are taken from an internal number range and serves as a reference of the EWM delivery document.
Note: The number range given here is available for LE delivery document so that the reference delivery number in LE can be generated with same delivery number as EWM.
4.3.2 Map Document Types from ERP System to EWM
Before proceeding further let’s revisit our LE delivery configuration.
We have configured the below for our car business
- Inbound Delivery type – YEL
- Inbound Delivery Item type -YELN
- Outbound Delivery type -YOBD
- Outbound Delivery Item type -YTAN
Please check the below post for detail configuration steps of the above
Configure SAP S4 HANA Sales Documents in 10 Minutes
In this configuration we will map document type from ERP to the document type of the warehouse request
- We can assign one ERP document type to the several document types of the warehouse request.
- Or we can map a document type of the warehouse request to the more than one ERP document type.
Configure this assignment as per the below path
SPRO –> SCM Extended Warehouse Management –> Extended Warehouse Management –> Interfaces –> ERP Integration –> Delivery Processing –> Map Document Types from ERP System to EWM
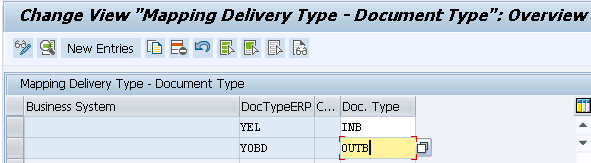
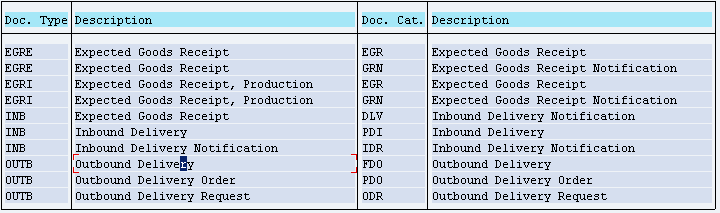
Please note that every document type in EWM belongs to a document category. Document Category are EWM specific and cannot be changed.

Please see below some of the most used EWM Document types and their corresponding Document categories
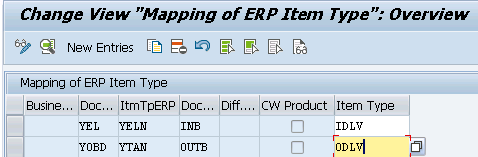
4.3.3 Map Item Types from ERP System to EWM
In this configuration we will map item type from ERP to the item type of the warehouse request
- We can assign one ERP item type to the several item types of the warehouse request.
- Or we can map a item type of the warehouse request to the more than one ERP item type.
Configure this assignment as per the below path
SPRO –> SCM Extended Warehouse Management –> Extended Warehouse Management –> Interfaces –> ERP Integration –> Delivery Processing –> Map Item Types from ERP System to EWM
EWM item type is determined according to the ERP Document type, ERP Item Type, EWM Document type, Differentiation Attribute & Catch weight.
4.3.4 Map Date Types for Inbound Delivery
For Inbound delivery below is the setting for our car business

4.3.5 Map Partner Roles from ERP System to EWM
We will revisit this section at the time of delivery replication to EWM.
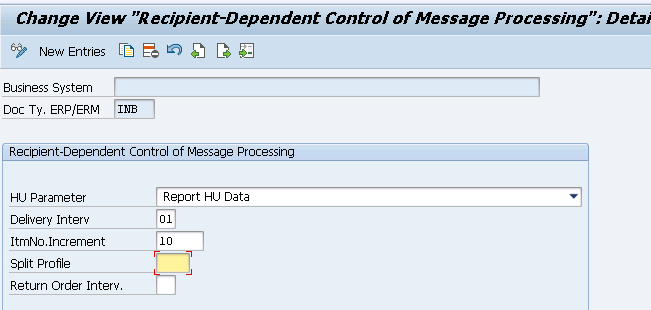
4.3.6 Control Message Processing Dependent on Recipient
Here we configure the settings to send messages from EWM to SAP S/4HANA or SAP ERP.
These parameters are for inbound deliveries as well as for outbound deliveries
4.3.6.1 Parameters for Inbound Deliveries
Below are the parameters for inbound delivery
1)-Control Parameters for Confirming HU Data
Here we control the parameter for returning handling unit data from EWM to S4/ERP.
If we do not want to report HU data to the SAP S/4HANA or SAP ERP, during the goods receipt then we set the Do Not Report HU Data in Goods Receipt Process indicator.
2)-Delivery Interval
This parameter is for the deliveries originating from the EWM system due to
- Inbound or Outbound Delivery split of the original delivery and distributing the same to LE.
- Inbound deliveries created directly in EWM.
- Direct outbound delivery orders created directly in EWM.
In this case EWM system governs the delivery number.
We have already defined the number range for LE delivery in the step 5.1 Define Number Ranges for LE Deliveries. Also, we have ensured that this number range does not overlap in the LE/ERP. So, we will input the same for our inbound delivery as “01”
3)-ItmNo.Increment
Here we Enter the increment for the item number. It should match with the increment defined in the LE/ERP system for this document type.
We will input “10” for our deliveries.
1. Business Scenarios in EWM Inbound
We will configure & test below inbound scenarios in this post
- Inbound Scenario 1 -Automatic Packing in EWM inbound Delivery
- Inbound Scenario 2 -Inbound with automatic creation of Unloading tasks followed by repacking & putaway
- Inbound Scenario 3 – Inbound with simple unloading & manual TU
1.1 Business scenarios using POSC (Process oriented Storage Control)
Below two scenarios use POSC (Process oriented Storage Control). We will configure and test each scenario step by step in detail.
Scenario 1 - ASN to EWM with vendor Packaging --> Unloading --> GR --> Repack in own packaging --> Put away

Scenario 2 - ASN to EWM with no packing in S4 --> Packing in EWM Inbound Delivery --> GR --> Auto Unloading --> Put away (This scenario is for dangerous goods)
1.2 Business scenarios using LOSC (Layout Oriented Storage Control)
1.3 Business scenarios using both POSC & LOSC (Layout Oriented Storage Control)
1.4 Special business scenario – Spare parts inbound
2. Inbound Scenario 1-Configuration & Testing
One of our material “Diesel Car Battery” Goods receipts happens in INB Staging Section A and then Hand over is done to Repacking & sampling section & then PTWY done in Diesel Division after repacking.
1.1 Main Features of scenario 1
The main feature of this scenario are
--> Material of this scenario is classified as DANGEROUS goods. So we will create & put away the material following all the dangerous goods procedures.

--> Suppliers supply the materials in their loose packing which is not suitable for storage in our WH

--> Because of above reason material is unpacked in system in ASN as well as in Inbound delivery

--> Once physical goods is received and WH personal checks it  through SCWM/PRDI, packing is done in delivery and labels are printed.

--> Upon unloading, task is automatically generated and confirmed in the background.

--> As soon as unloading task is auto confirmed , repacking task to the Ho Area is automatically created in the background.

--> HO area is determined in the background through external step configuration and once HO is done HU is closed at HO WC

--> Once HU is closed, final PTWY task is created with final destination storage area & storage bin
1.2 Create the Purchase Order
As usual scenario starts with PO creation. Since this material is classified as dangerous goods, so we will create a new material.
1.2.1. Material Creation
Create the material “Diesel Car Battery” through MM01 and the further create it in our warehouse as explained in the below post
Creating the material for S4 HANA EWM
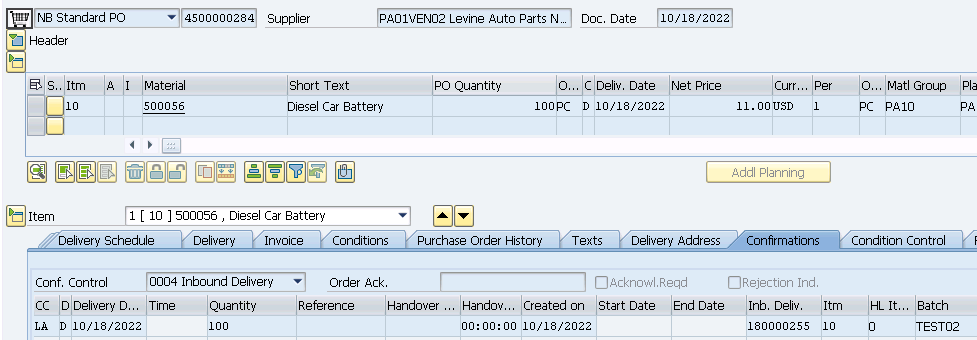
Created PO for this material
We have created below PO for this material for 100 Qty
Please check the below post for step-by-step PO creation process
Create Standard Purchase Order
1.3 Create Inbound Delivery in S4/ECC/LE
Based on the PO, we have created the inbound delivery
Please see the below post to check step-by-step configuration of inbound delivery
YEL-Inbound Delivery for our car business
Please note that we have packed the material in inbound delivery while creating the delivery.
Let’s assume supplier packs 10 batteries in a box so in our inbound delivery there will be 10 boxes for a total of100 batteries.
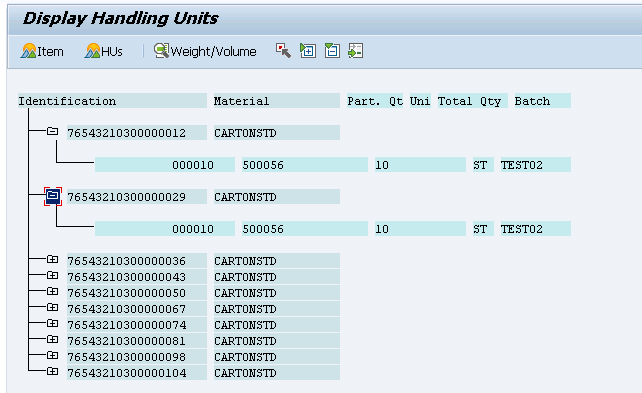
Please check the below post to see how to pack in inbound delivery
SAP Storage Unit Management and Handling Unit Management
Inbound delivery is created and distributed to EWM
1.4 Inbound Delivery in EWM
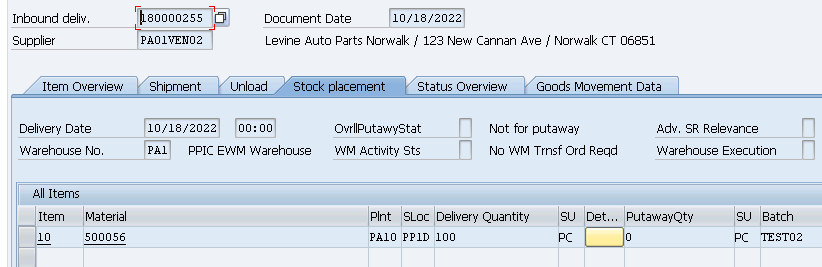
As soon as we saved the inbound delivery in S4/ECC/LE, it is distributed to the warehouse PA11
Inbound delivery is in EWM with HUs so no need to pack in EWM
Check the inbound delivery in EWM
1.4.1 Inbound Delivery Header in EWM
Below information is present at inbound delivery header in EWM
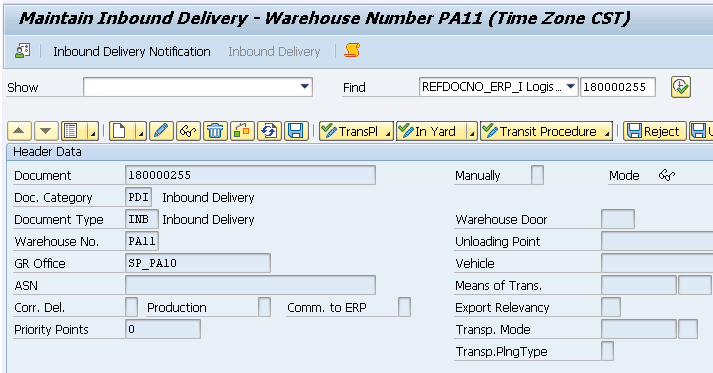
Please note down the document category and Document type “INB” determined for our IBD
Please check the below post to see how document type is determined in the EWM corresponding to the LE delivery
Map Document Types from ERP System to EWM
1.4.1 Inbound Delivery Line Item in EWM
Check the inbound delivery line item in EWM
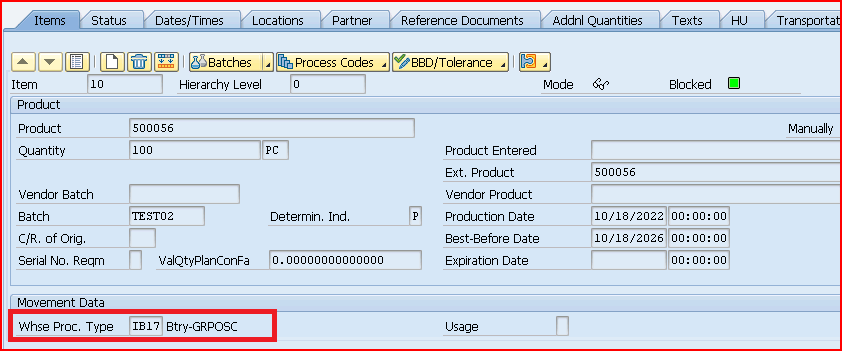
1.4.1.1 Item Type determined in IBD
Please note down the item category and item type “INB” determined for our IBD

Please check the below post to see how item type is determined in the EWM corresponding to the LE delivery
How to Integrate SAP EWM Warehouse in 7 Easy Steps-Map Item Types from ERP System to EWM
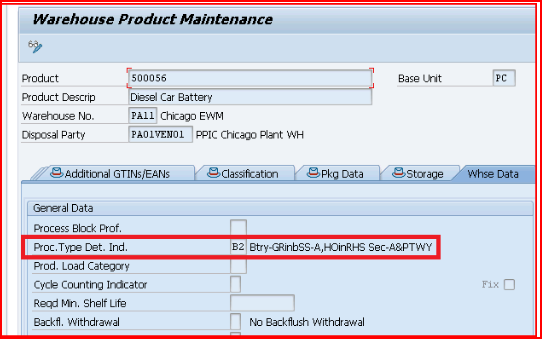
1.4.1.2 How WPT IB17 is Determined
Note down the Warehouse Process Type determined in IBD.
WPT – IB17
WPT is determined because of the “Process Type detector indictor” as “B2” in the product
Please click HERE have a complete overview of Process Type detector indictor”
You can download all the WPT indicators configured for our WH PA11 (Approximate 29 entries) from the resource center HERE
Please click HERE to check how system determines warehouse process type.
In the above case below is the configuration related to the WPT determination for the system to select the WPT as IB17
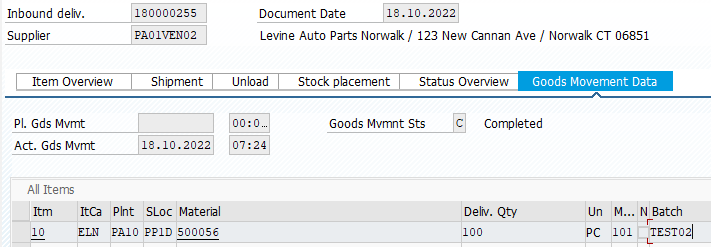
1.5 Unloading the delivery
Since it is a simple unloading so just click on “Unloading” and Unloading status will change to “Completed”
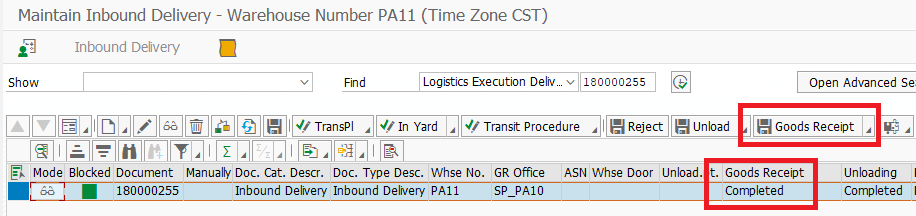
1.6 Goods Receipt of the delivery
As per our car business process, we will do the goods receipt of the inbound delivery before starting the put away process.
Simply click on the “Goods Receipt” button and system will do the GR in EWM and a message will be sent to S4/LE to complete the GR
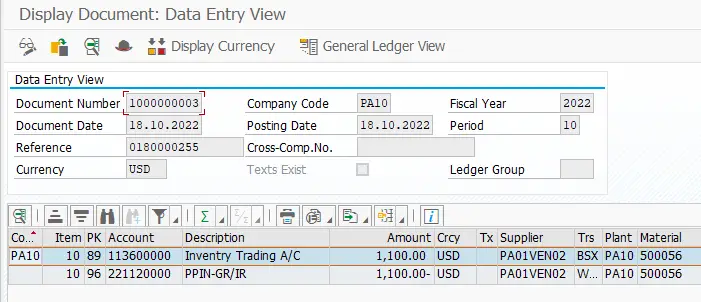
1.6.1 Message to S4/LE
As soon as GR is done, message is sent from EWM to S4/LE to complete the GR
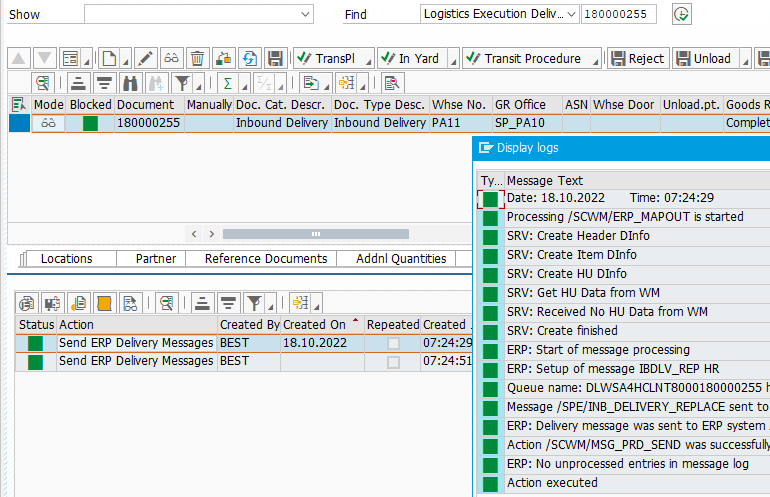
Goods receipt is posted for LE delivery and accounting document is generated
Please check the below post to have a detailed overview of MM-FI settings
Ultimate guide to configure S4 HANA MM-FI Integration
1.7 First Warehouse task creation
Now we will start put away.
System has created Warehouse Task automatically as soon as unloading is completed.
Note down the different parameters determined in the warehouse task as shown in the below screenshot
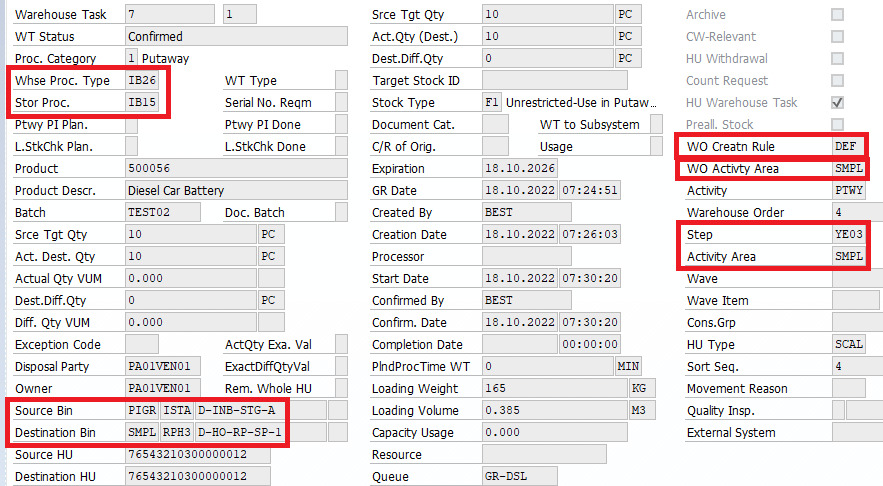
Please note done below parameters determined in the WT

--> Storage Process - IB15
--> Step -YE03
--> Activity Area -SMPL
--> WO Activity Area -SMPL
--> WO Creation Rule -DEF

We will look the determination of each of the above in detail
Let’s have a look on all parameters and how/why they are determined in IBD WT
1.7.1 Storage Process
System has determined the storage process as IB15.
This storage process is determined because of assignment of the same to WPT

Check the storage process IB15 configuration
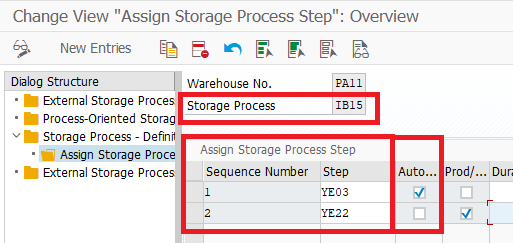
1.7.2 Storage Process Step
Step “YE03” is determined as per the storage process “IB15” as shown above.
Please see the below post to check the complete configuration of the external steps
Understanding EWM Master Data-Define External Storage Process Step
Let’s see the configuration of steps

In the above screenshot of step configuration, since our source storage type is PIGR so third row of step configuration will be applicable.

--> Destination Storage type will be "SMPL"
--> Destination Storage Section will be "RPH3"
--> WPT for this WT will be "IB26"
--> Destination Bin will be "D-HO-RP-SP-1" , which will be used to determine Work center along with destination ST "SMPL"

--> The checkbox "Rule-Based" influences the determination of destination storage type & bin date. Please see below post to understand in detail.

Understanding EWM Master Data-Source & Destination Storage type
1.7.3 Work-Center Determination for Repacking
Since in the first WT, as per the storage process IB15, HUs will be taken to a work center for repacking, system needs to determine the work center to repack the HUs
Please check the below post to know the work center determination process in EWM in detail
Understanding EWM Master Data-Determination of work center
but in brief
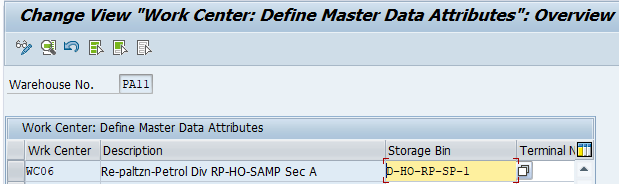
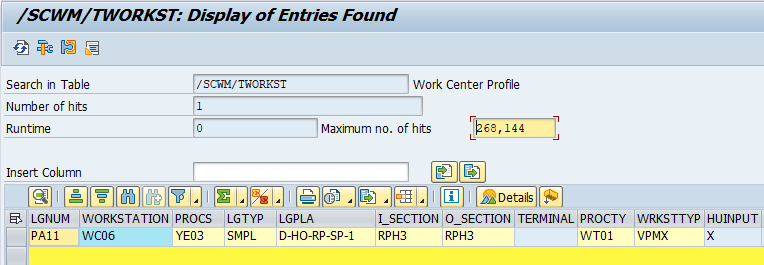
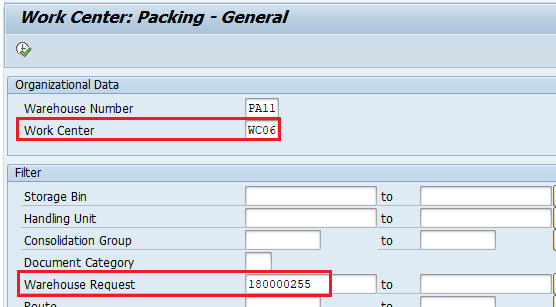
To determine the work center, System picks the ST & BIN from the external step and look for the assigned work center in the table/transaction “/SCWM/TWORKST”.
As per the below screenshot system will take these HUs to work center “WC06” for repacking in this external step “YE03” through first WT.
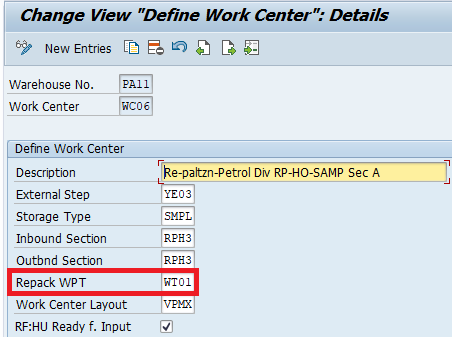
For repacking system determines the WPT as “WT01” as per the determined work center “WC06” configuration.
Please see the screenshot below
1.8 First Warehouse Order Creation
The WTs created in the first step needs to be assigned to a WO. for this first system needs to determine the activity area.
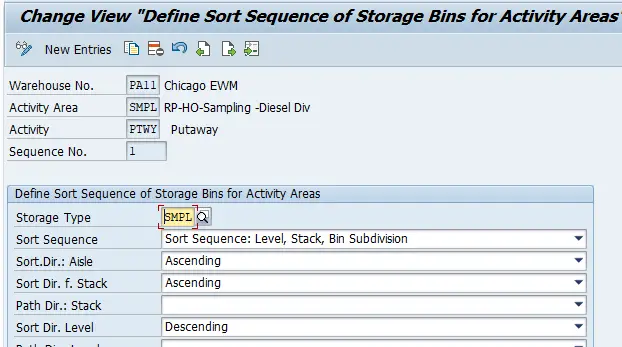
1.8.1 Activity Area Determination
For the first task, activity area will be decided as per the WPT of the GR step (IB17)
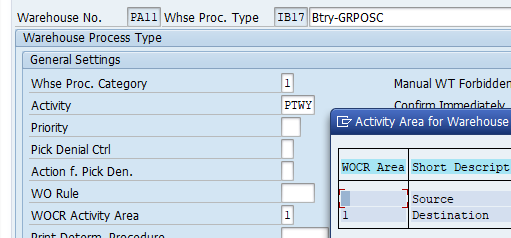
So the Activity area of the WOCR will be as per the destination.
Source is storage type “PIGR”
Activity Area for source ST, SS and BIN will be “IDST”

Destination is storage type “SMPL”
As per the below configuration screenshot, for PTWY activity activity area will be “SMPL” for the Storage Type “SMPL”
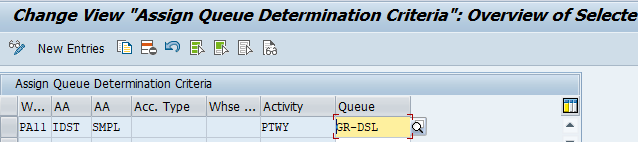
1.8.2 Queue Determination
Warehouse orders are assigned to the queues as per the queue determination configuration
We need to check queue access sequence to know where queue determination happens.
1.8.2.1 Queue Access Sequence
Let’s check the queue access sequence configured for our warehouse PA11
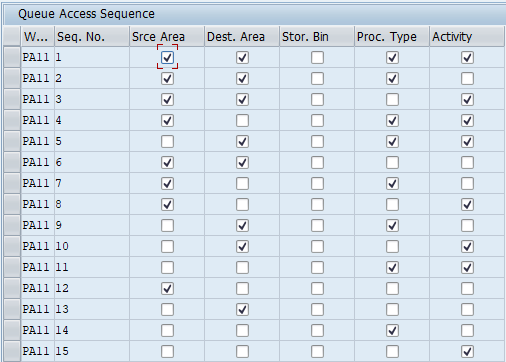
Queue determination is hit on sequence 3
1.9 Second Warehouse Tasks Creation
Now we will perform the repacking on the determined work center WC06
Go to /SCWM/PACK
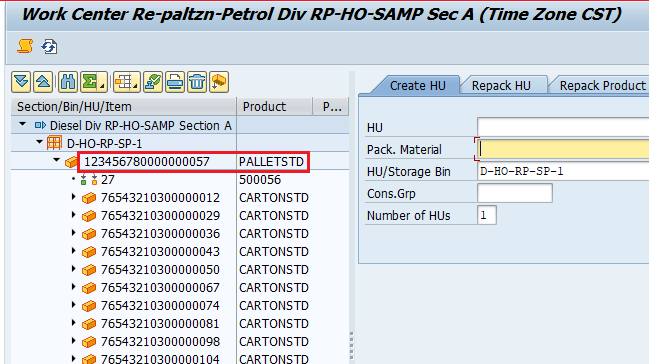
Repacking done – All the HUs are repacked on a Pallet.
During repacking, system create and confirm the warehouse tasks in the background with WPT as WT01.
1.9.1.1 WPT Determination
System will determine the repacking WPT from work center configuration
For repacking system determines the WPT as “WT01” as per the determined work center “WC06” configuration.
Please see the screenshot below
As per WPT WT01 configuration, while repacking , WT will be confirmed automatically in the background.

1.9.1.2 Queue Determination
Queue is determined on the basis of the below configuration

1.10 Third Warehouse Tasks Creation (REPACK WC->FINAL PTWY)
This warehouse task is corresponding to the second step of our storage process IB15 determined through WPT.
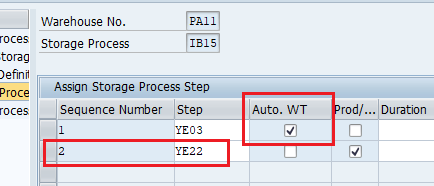
--> Indicator "Auto WT" in the first step determines that system will automatically create the subsequent warehouse task (subsequent WT corresponding to the step YE22). This automatic WT will be created at the time of "Completing the process step for the HU" at WC.

--> Since step YE22 configuration does not has rule based WT creation checked so system will search final PUTAWAY storage style & BIN as per the put away strategy (Put away Control Indicator & Storage Type Search Sequence)
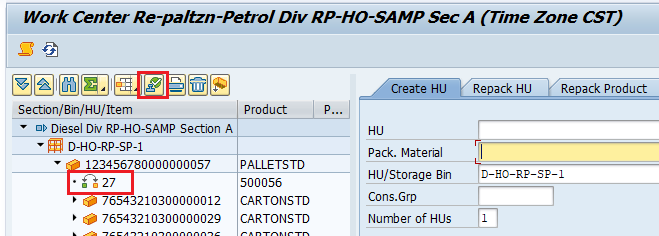
As soon as we close the step in the WC, system has created the WT number 27 automatically as shown in the below screenshot
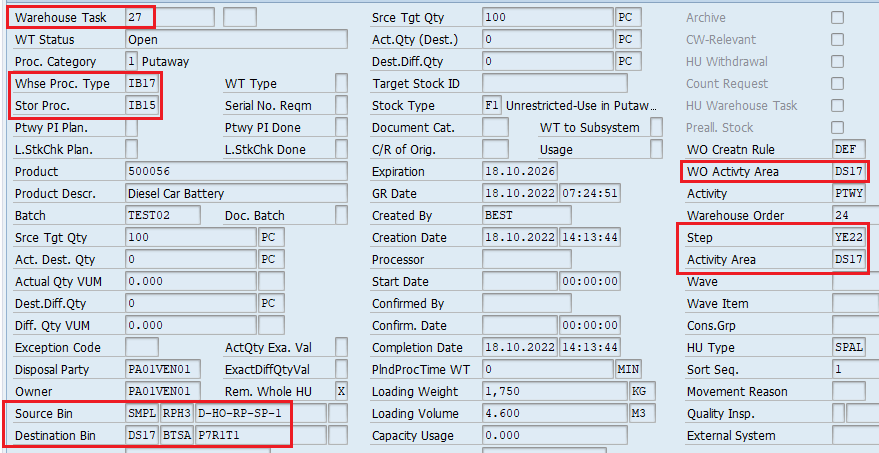
1.10.1 WPT Determination
WPT is determined as IB17 as explained in section 1.4.1.2
1.10.2. Destination Storage Type Determination
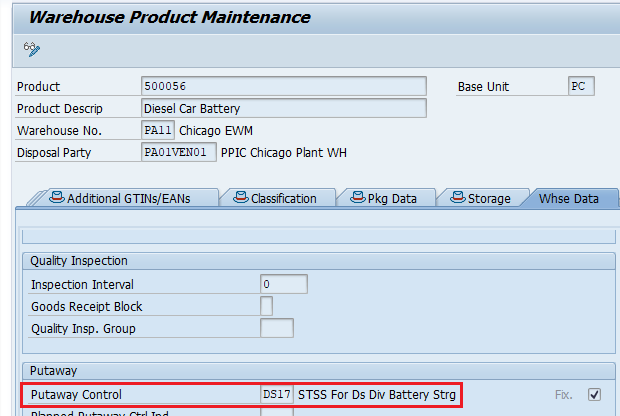
Destination storage type (and Storage Bin) is determined based upon the “Put away Control Indicator (PACI)” in product, Storage Type Search Sequence (STSS) & then finally determination of Storage Type based on determined STSS
a)-Put away Control Indicator (PACI)
This controls the put away of specific products in specific storage types.
for our product, we use PACI as “DS17”
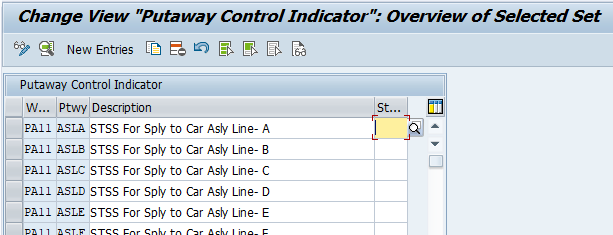
a.1)- Configuration of PACI
PACI is configured as per the below path
SCM Extended Warehouse Management –> Extended Warehouse Management –> Goods Receipt Process –> Strategies –> Storage Type Search –> Define Put away Control Indicator
We have configured 52 PACI for our car business
You can download all the 52 PACI configured in excel from the resource center HERE
For the ease in understanding configure PACI name same as the storage type you want to put away in
So in this scenario we have configured PACI as DS17 because we want to put in storage type DS17
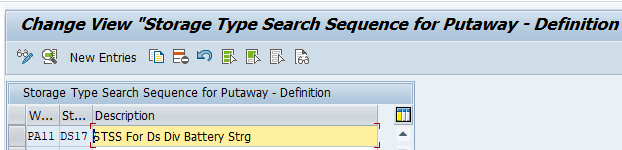
b)-Define Storage Type Search Sequence (STSS) for Put away
Based on this configuration, system searches the storage types to searches for destination storage bins.
Under Storage Type Search Sequence, we creates a priority list of sequence of storage types and storage type groups, system should search for destination storage bins.
b.1)- Configuration of STSS
STSS is configured as per the below path
SCM Extended Warehouse Management –> Extended Warehouse Management –> Goods Receipt Process –> Strategies –> Storage Type Search –> Define Storage Type Search Sequence for Put away
We have configured 60 STSS for our car business
You can download all the 60 STSS configured in excel from the resource center HERE
--> Here also we can apply the same principle - configure the STSS name same as target storage type but please note that here we might input several destination storage types & storage groups to which we have even very slight chance to put in.
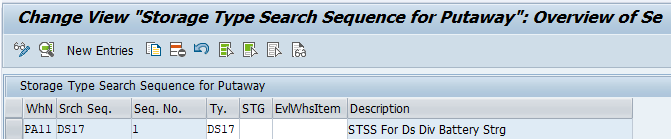
c)-Assign Storage Types to Storage Type Search Sequence
In this configuration we enter all the target (& possible) storage types where system should search the destination bin for put away
c.1)- Configuration of assign Storage Types to STSS
This configuration is done through below path
SCM Extended Warehouse Management –> Extended Warehouse Management –> Goods Receipt Process –> Strategies –> Storage Type Search –> Assign Storage Types to Storage Type Search Sequence
For our warehouse we have configure approximately 90 lines of this configuration.
You can download all the 90 lines of Assign Storage Types to Storage Type Search Sequence in excel from the resource center HERE
d)-Specify Storage Type Search Sequence for Put away
In this configuration , we configure all the parameters which influence this search and corresponding target storage type search sequence (STSS).
Please note through this configuration, system finds the target list of storage type(s). There are still some further factor to determine the destination storage bin like -storage section etc.
d.1)- Configuration of Specify Storage Type Search Sequence for Put away
This configuration is done through below path
SCM Extended Warehouse Management –> Extended Warehouse Management –> Goods Receipt Process –> Strategies –> Storage Type Search –> Specify Storage Type Search Sequence for Put away
For our warehouse we have configure approximately 153 lines of this configuration.
You can download all the 153 lines of Specify Storage Type Search Sequence for Put away in excel from the resource center HERE
For our this scenario we have configured as below screenshot

Now system will select the target storage type ST17.
Configuration of Storage type DS17 checks for storage section so we need to do the further configuration of storage section determination and then system will search the bin assign under that determined storage section.
1.10.3 Destination Storage-Section Determination
Since our targeted storage type mandates to have storage section checks, so we will configure storage section determination.

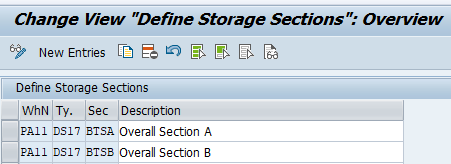
a)-Define Storage Sections
First we will define storage section as per our warehouse layout.
a.1)-Configuration of Storage Section
Please check the below post on configuration of storage section
Understanding EWM Master Data-Define Storage Sections
We have defined the below storage section for our DS17 ST.
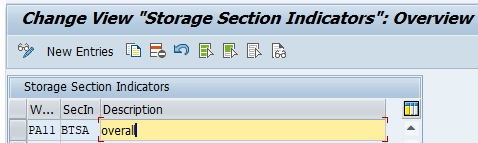
b)-Create Storage Section Indicators
Storage section indictor helps to determine the storage section for a specific product.
For example for our product of this scenario we will use BTSA storage section so that material can be steered towards the storage BINS only under this section.
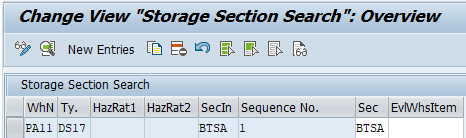
c)-Maintain Storage Section Search Sequence
Storage section search sequence creates the preference list for the storage sections for put away . The system first searches for a storage bin in the first storage section. If it does not find a storage bin there, the system searches in the second storage section, and so on.
putaway the material
Status /SCWm/RFU
We need to scan all sub-HUs
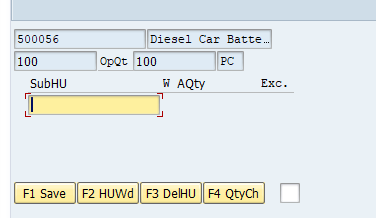
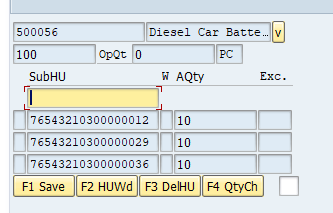
Warehouse task is confirmed and now all HUs are on “Available for sale” storage location.
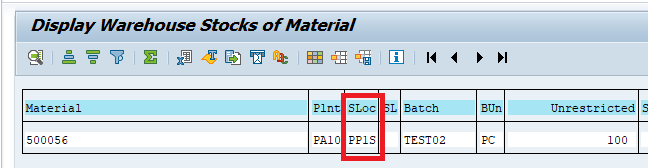
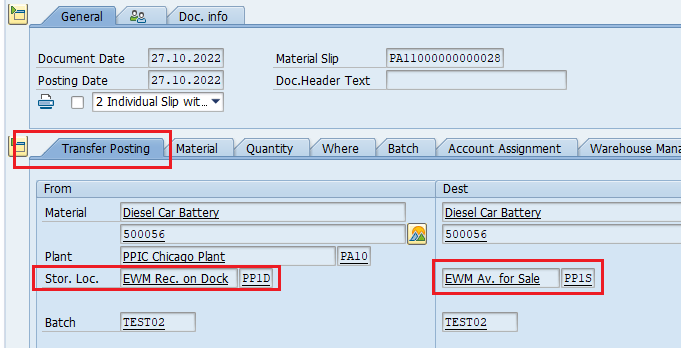
Please check the below post for details how availability check and flipping of location from “Receive on dock” to “Available for Sale” works in EWM
How to Integrate SAP EWM Warehouse in 7 Easy Steps-How Availability Works in EWM
2. Inbound Scenario 2: Dangerous Product PTWY-Auto Unload & POSC
Below are the main features of this scenarios
2.1 Main Features of scenario 2
The main feature of this scenario are
--> Material of this scenario is classified as DANGEROUS goods. So we will create & put away the material following all the dangerous goods procedures.

--> Suppliers supply the materials in their loose packing which is not suitable for storage in our WH

--> Because of above reason material is unpacked in system in ASN as well as in Inbound delivery

--> Once physical goods is received and WH personal checks it  through SCWM/PRDI, packing is done in delivery and labels are printed.

--> Upon unloading, task is automatically generated and confirmed in the background.

--> As soon as unloading task is auto confirmed , put away task is created automatically.

--> Put away task is confirmed manually and Products in the HU is reached to the final destination storage bin.
2.2 Create the Purchase Order
As usual scenario starts with PO creation. Since this material is classified as dangerous goods, so we will create a new material.
2.2.1 Create Material
Material creation is covered in the below post. Please check the below post to have a detailed overview of material creation.
2 Minutes Guide to Create your First Material in S4 HANA-Creating the material for S4 HANA EWM
Here our focus will be dangerous goods related setting in the material.
2.2.1.1 Dangerous goods Related settings
Below are the settings in S4/EWM
a)- Setting in S4/LE
We have created a new material for this scenario. This material is same as scenario 1 leaving the below dangerous goods related settings
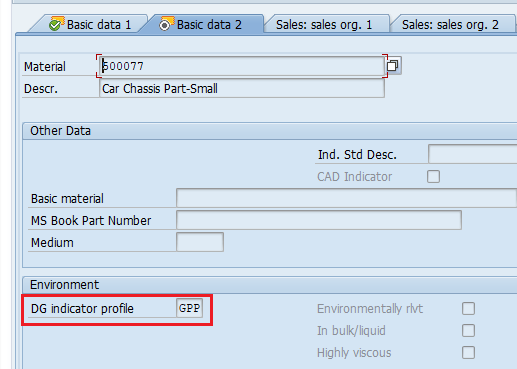
“Basic Data 2” view
Maintain the “DG indicator profile” on basic data 2 view.
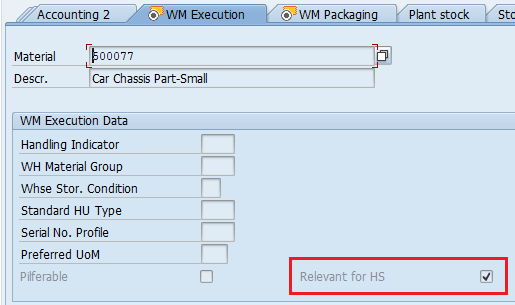
“WM Execution” view
Select “Relevant for HS” checkbox on “WM Execution View”
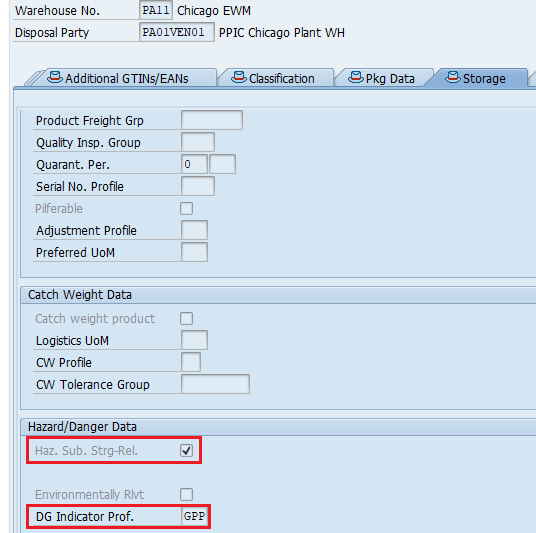
b)- Setting in EWM
Below is the effect of the S4/LE material master dangerous goods settings
EWM Product Master “Storage” view
Go to the “Storage ” data view after displaying the material through “/SCWM/MAT1”
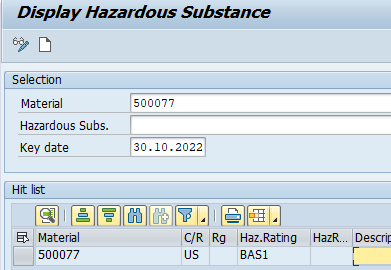
c)-Hazardous Substance Master Maintenance
We will maintain the Hazardous Substance master so that while put away system take the hazardous indicator in consideration
Below is the path to maintain the Hazardous Substance Master
SAP Easy Access –> Logistics –> SCM Extended Warehouse Management –> SCM Basis –> PS&S Services –> Hazardous Substance Management –> Hazardous Substance Master –> Edit Hazardous Substance Master (HSMD)
Note : Please check the Hazardous rating configuration HERE
We have created PO is created in S4/LE for our material classified as dangerous goods.
Please check the below post to have a detail overview for the PO related configuration
All About Purchase Orders in SAP MM
2.3 Creation & Distribution of Inbound Delivery
We have created delivery in S4/LE through VL31N and distributed to EWM
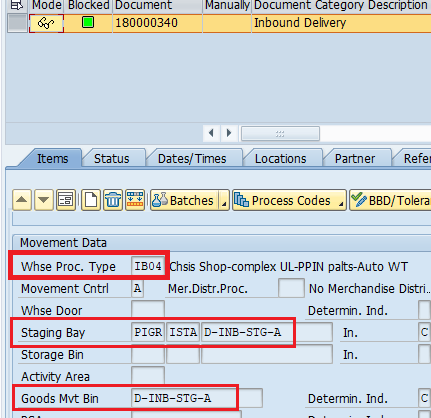
2.3.1 WPT Determination
WPT is determined as per WPT indicator of product master
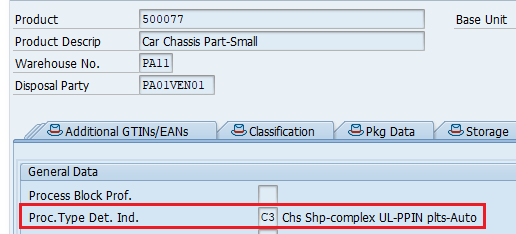
2.3.1.1 WPT Determination Configuration
Below is the configuration which is driving the determination of WPT

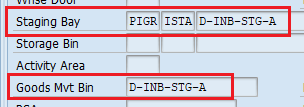
2.3.2 Staging Bay Determination
Below staging bay is determined in IBD
2.4 Packing in IBD
We will do the packing in IBD . Please note that it is necessary that HU recognize the storage process in order to proceed further with POSC.
We have done packing and HU has successfully recognized the process step as per given in WPT
2.5 Auto Unloading
Click on Unload

System will create & confirm auto unloading task automatically in the background.
2.5.1 Configuration of Auto Unloading WT
Due to the above configuration, unloading task is automatically created and confirmed
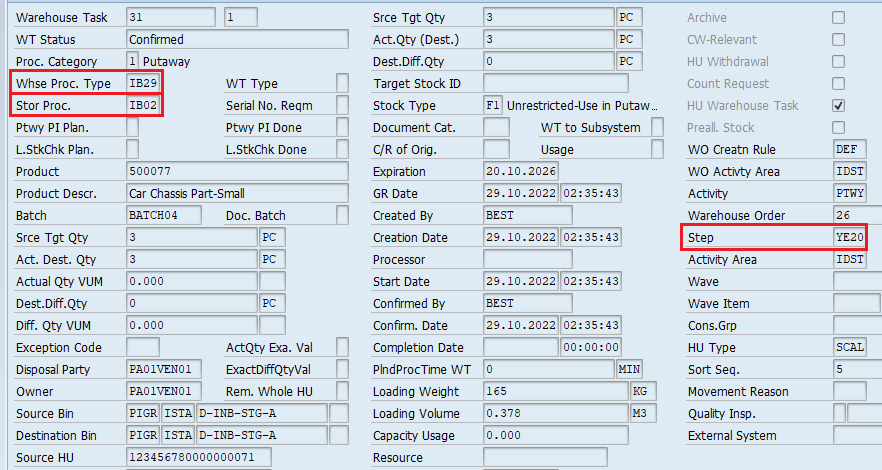
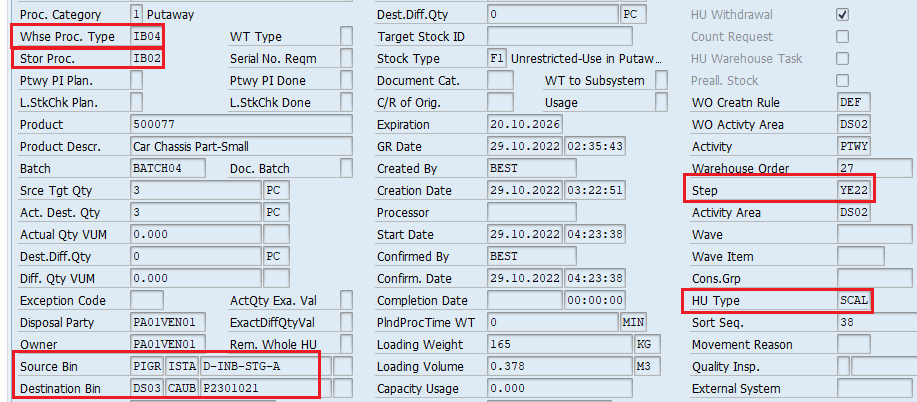
2.5.1.8 Storage Process Determined
In the above unloading task we can see that Storage process is determined as IB02
This is because of WPT IB04

2.5.1.9 Storage Process Configuration
We will see the configuration of storage process IB02
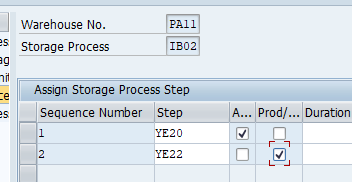
Below is the effect of Storage process configuration
--> There are two steps in this process (Unload, YE20 & Put away, YE22)

--> In the first step "Create WT Automatically" checkbox is ticked. This means system will create automatic WT for the consecutive step i.e. put away

--> in the second step In the goods receipt process "Create Product/HU WT" checkbox is selected, this means product WTs and HU
 WTs for the put way will be created when the HU WTs are created for the
 first step (unloading).
2.5.1.10 Storage Process Steps Configuration
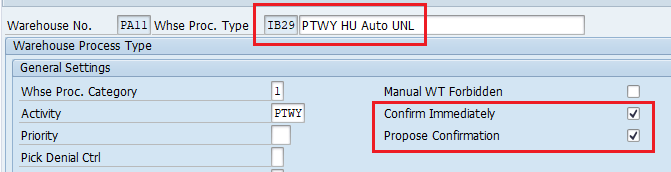
Below is the configuration of two external steps YE20 & YE22


Below is the effect of steps configuration
--> For unloading step YE20 , system will use WPT as IB29.

--> As per our scenario, we have configured PPF for auto unload task creation & conformation. WPT IB29 supports this. Please see the screenshot below

--> For unloading step "Rule-Based" in ticked that means destination storage type & bin will be selected automatically as per /SCWM/STADET_IN
2.6 Final Put away
As explained above system has created Warehouse Task for put away automatically.
Since there is no special configuration for PTWY external steps, put away WT will be created as per standard destination storage type & bin search strategy.
2.6.1 Configuration of Destination Storage type & BIN
Since this material is classified as dangerous goods, so put away will be influenced by dangerous goods indicator
2.6.1.1 Configuration of dangerous goods
These configurations refer to the hazardous substance master for checks in Extended Warehouse Management.
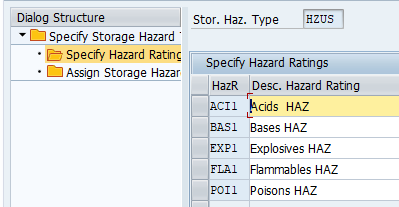
a)-Specify Storage Hazards
These storage hazards are first use in the hazardous
substance master. and then used in the put away checks in storage type & storage section check.
Below path is used to configure this
SPRO –> Product Safety and Stewardship –> Product Safety –> Hazardous Substance Master –> Master Data –> Specify Storage Hazards
We have configured the below


Now we need to assign corresponding hazard rating to the Hazardous Substance Master as explained HERE
2.6.1.2 Storage type Search Sequence
In the product we have used put away control indicator as DS03
So as per PACI and Haz. rating system has determined STSS as “DS03”

We need to assign HAZ Rating 1 & 2 to the targeted storage type otherwise system will throw error
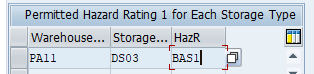
a)-Assign Permitted Hazard Rating 1 for Each Storage Type
Follow the below path for this configuration
SPRO –> SCM Extended Warehouse Management –> Extended Warehouse Management –> Master Data –> Hazardous Substance -> Assign Permitted Hazard Rating 1 for Each Storage Type
We have assigned BAS1 to our ST DS03
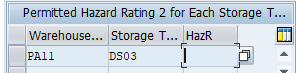
b)-Assign Permitted Hazard Rating 2 for Each Storage Type
We have assigned blank here but presence of our targeted storage type is mandatory here to avoid the error in putaway
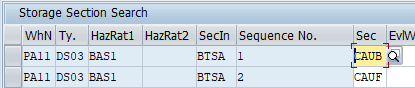
2.6.1.3 Storage section Search Sequence
Since this hazardous material will be stored in a section of the ST DS03 so we have configured the storage section indicator and storage section search.
Follow the below path for storage section configuration
SPRO –> SCM Extended Warehouse Management –> Extended Warehouse Management –> Goods Receipt Process –> Strategies -> Storage Section Search –> Maintain Storage Section Search Sequence
2.6.1.4 HU Types Determination
Since HU type check is active in our targeted storage type DS03, so for each storage type the permitted handling unit types (HU types) are defined in this configuration.
The path for this configuration is below
SPRO –> SCM Extended Warehouse Management –> Extended Warehouse Management –> Goods Receipt Process –> Strategies -> Storage Bin Determination –> HU Types –> Define HU Types for Each Storage Type
We have HU types as SCAL & SPAL. Please see the below post to see the HU type configuration
An Ultimate Guide for Initial S4 Settings to Configure EWM-Define Handling Unit Type
We have assigned our targeted DS03 storage type to our HU types SCAL & SPAL

2.6.1.5 Storage Bin Determination
to improve the performance we can assign storage bin types to storage type.
Please follow the below path for storage bin determination
SPRO –> SCM Extended Warehouse Management –> Extended Warehouse Management –> Goods Receipt Process –> Strategies -> Storage Bin Determination –> Assign Storage Bin Types to Storage Types
We have configured several storage bin types for our WH. Please see the below post for detail
Understanding EWM Master Data-Define Storage Bin Types

2.7 End of Inbound Scenario 2
product is now in the final storage type DS03 based on the configuration as explained above.
Since availability group 0002 is assigned to the ST DS03, system has flipped the storage location in S4/EWM from Receive on Dock to Available for Sale through 411 material document posting.
🔍 Explore the Complete S/4HANA–EWM Integration Series
If you’re working with EWM processes like WPT, ST, LOSC, POSC, or warehouse execution, understanding how EWM connects with S/4HANA is essential. This 7‑part integration series explains the full technical flow, mapping logic, document integration, and real‑world configuration steps that every EWM consultant should know.
- Technical Connectivity Between S/4HANA & EWM
- ERP‑Side Settings for EWM Integration
- EWM‑Side Settings & Warehouse Setup
- Stock Type, Availability Group & Mapping Logic
- ERP → EWM Document Integration Flow
- Extra Steps for Decentralized EWM on S/4HANA
These posts will give you the complete picture of how EWM interacts with S/4HANA behind the scenes — a must‑have foundation for mastering any advanced EWM process.
Different materials of our car business warehouse follow the different routes for inbound.
In this post we will see some important inbound route followed by our materials
Image by xvector on Freepik


