
Storage Type represents structuring of the warehouse using technical, spatial, and organizational characteristics.
or operational characteristics. Understanding this concept is essential for mastering
putaway rules, stock removal logic, HU behavior, and overall warehouse design in EWM.
Storage Types are the foundation of every EWM warehouse — and yet they are the most misunderstood configuration object. Whether you are designing a new warehouse, troubleshooting stock placement, analysing WT creation, or mapping complex staging flows, everything eventually comes back to how your Storage Types are structured and controlled.
This guide is your anchor reference for Storage Types in SAP EWM. Here, you will learn every field, every control parameter, every behavioural setting, and how each one influences putaway, stock removal, HU handling, bin determination, and process execution across Embedded and Decentralized EWM.
If any EWM process in your system behaves unexpectedly — picking wrong bins, rounding quantities, splitting stock, rejecting HUs, or ignoring capacity — the root cause is often hidden inside Storage Type configuration. This post gives you the complete, consultant‑level understanding you need to design stable, predictable, and scalable warehouse behaviour.
complete configuration flow. This anchor guide walks you through every setup required
to configure both Embedded and Decentralized EWM in SAP S/4HANA — from basic settings
to full integration.
1.1 Explanation of all fields of a storage type
We will explain all the fields of a storage type and review how we have configured for our car business.
we will take example of one of our storage types and explain all the fields
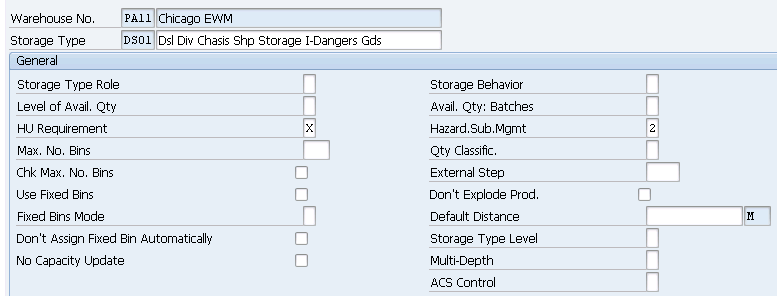
1.1.1 Fields in “General” Section of Storage Type Configuration
These settings are not specific to any warehouse movements
Please see the below screenshot to see all the fields available in this section and explanation of each field is given below
1)- Storage Type Role
Storage type role represents the usage of the storage type. Storage type must be assigned to a storage type role
Below is the list of storage type role
- Standard Storage Type: This is where products are stored.
- Identification Point: In this ST, goods are labelled, identified, and/or checked during the put away process.
- Pick Point: Here goods are checked, labeled, inspected, and/or packed during the goods removal process.
- Identification and Pick Point: Area in the WH where both pick point & Identification point are located.
- Staging Area Group: This role is assigned to storage types in which goods are staged right before brought into or out of the warehouse.
- Work Center: Work center ST represents area where deconsolidation, inspection, packing or VAS processing takes place.
- Doors: This ST represents door of a warehouse from where goods travels in and out of warehouse.
- Yard: A yard attached to the warehouse.
- Automatic Storage Retrieval (Material Flow Control): Area in the WH using automated storage and/or retrieval, for example – conveyor system.
- Automatic Warehouse (Controlled by MFS): Automated high-rack storage area with a stacker crane.
- Work Center in Staging Areas Group: This represents a work center within a material staging area
- Production Supply: An area where products for the production are staged, near the production line.
Below are the Storage type roles (other than standard storage type) configured for our car business Storage types
2)- Level of available Quantity
Level at which the stock is present to remove. If storage bin level is selected, the warehouse task created for stock removal has no source HU selected. So, picker has the flexibility to select the most easily available HU rather than an HU at an inaccessible location.
if HU level is selected then warehouse task is created with a source HU. HU option can be selected for storage types such as work centers for which a specific HU needs to be specified in the warehouse task.
3)- Handling Unit Requirement
Here we decide whether stock is placed in the warehouse with HU or without HU. There is another option “HU Required but Not a Requirement”, if this option is selected then we can stock both products and HUs in the storage type. Unlike standard warehouse management (WM), embedded EWM allows users to stock HUs and products within the same storage types and storage bins.
4)- Maximum Number of Bins
This option decided the maximum number of fix bins per product in the storage type to avoid one product to overfill the ST. After maximum bins are reached, product is directed to another ST. To make this field considered, we have to select “Check Max.No.Bins” indicator
Note: The warehouse product master also has a similar field in the Storage Type Data view to limit the maximum number of fixed bins in a storage type for that product. If this value is set in the product master, it’s given preference over the value set at the storage type level.
5)- Check Maximum Number of Bins
As discuss above to make the field “Maximum Number of Bins” work, we need to select this field.
6)- Use Fixed Bins
A storage type can use either fixed bins or dynamically allocated bins. If this checkbox is selected, then the system checks during put away if identified bin is a fixed bin. If it isn’t, then the system throws an error.
7)- Do Not Assign Fixed Bins Automatically
system check the values for this field if “Use Fixed Bin” is selected. If this field is selected then system does not assign fixed bin automatically in put away, system allow put away only in pre-allocated fixed bins maintained through transaction /SCWM/BINMAT.
8)- No Capacity Update
select this checkbox if updating the bin capacity is not required at the time of warehouse task confirmation. For example- With put away rule as “Empty” bin, this filed shouldn’t be selected.
9)- Storage Behavior
This field defines the general nature of storage type.
- Standard Behavior: used for general storage like std ST, Work center or PSA
- Pallet Storage: Pallets of a particular HU type are put into a bin, which creates bin subsections upon first put away. The subsections are later used for putting away of pallets of the same HU type. Depending on the HU type, the system creates identical subsections to stack the HUs together.
- Bulk: Storage space such as floor is divided into rows, and each row represents a storage bin. The pallets are stacked on top of one another and grouped into blocks.
10)- Available Quantity in Batches
There are two options here -Available Quantity: Batch-Specific & Available Quantity: Batch-Neutral. If batch natural i set then warehouse request is created without a specific batch and we can give the batch later, during warehouse task confirmation
11)- Hazardous Substance Management
This filed determines at what level hazardous substance should be managed. options are – no check, ST level or ST level & Storage section level
12)- Quantity Classification
Different packaging like each, cases, pallet etc. in which a product is stored in warehouse. The value set in this field is used during storage type determination in stock removal to identify the right storage type that stocks the products in the required unit. When a task is created for qty equal to the qty classification then system get the qty classification from the packaging specification level and used to determine the Stock removal search sequence.
In addition to this, quantity classification helps identify the operative unit of measure (UoM) from the packaging specification level. This operative UoM is also the alternative AUoM in the warehouse task.
We have configured the below Storage types with quantity classification
13)- External Step
The external step mentioned in this field is assigned to the HU which is reached to the storage type but has not achieved the required step from the routing profile in POSC. Here the last completed external step in the HU is overwritten by the external step maintained in the storage type.
14)- Do Not Explode Product
This setting toggles between tracking on product level or HU level. If this checkbox is selected, then movements can only be tracked at HU level rather than at product level. Tracking the movement of products within an HU may overload the system during HU task confirmation so use only for storage types that require such a detailed level of tracking.
15)- Default Distance
This is used if labor management is active. This holds the value of the default distance to reach the first bin in the ST
16)- Storage Type level
This setting is used to mapping the actual level at which storage type is located in warehouse. if left blank then system considers all STs at the same level.
17)- Multi Depth
This Field is only applicable for the storage type with role “J-Automatic Warehouse (Controlled by MFS)”. Here we specify the maximum bin depth of the storage bins or the storage bin types of the storage bins.
18)- ACS Control
This configuration controls the air cargo security status of goods in transit warehouses
1.1.2 Fields in “Put away Control” Section of Storage Type Configuration
These setting controls any stock movement where stock is placed into a bin in the ST. this movement can be the final GR or bin to bin movement.
Below are the settings that control the put away in embedded/decentralized warehouse
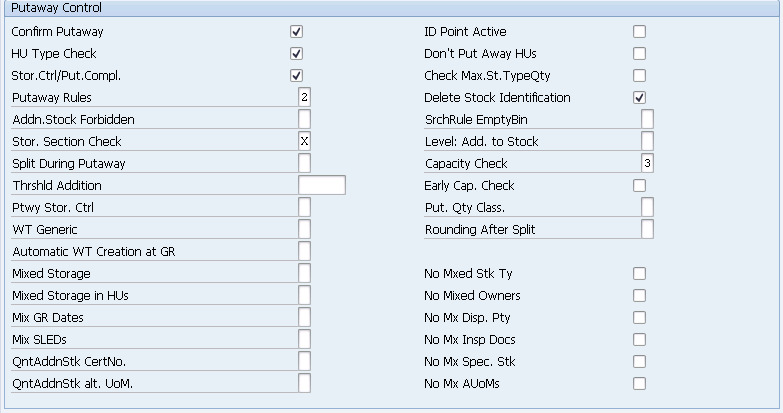
Let’s have an overview of all the fields present in put away settings of a ST
1)- Confirm Put-away
This is selected if put away of stock into that storage type requires confirmation of a warehouse task. If this checkbox is not selected, then stock in the destination bin will increase as soon as the put away warehouse task is created.
We have selected this for all of our storage types.
2)- Handling Unit Type Check
This fields checks if HU which is being put is allowed. This includes both if HU itself is allowed in this ST and HU is allowed with respect to the Storage bin type of this ST
3)- Storage Control/Put away Completed
This indicator indicates in a POSC, if this ST is final put-away ST and marks the end of process-oriented storage control during the put away process.
4)- Put away Rules
The value in the Put away Rules field plays a key role in how stock is placed in the bins of this storage type.
4.1)- Empty Bin
In this rule, the system puts stock in the next available empty bin. We can use bin sorting to determine
the sequence in which the system looks for the next empty bin.
4.2)- Addition to existing stock/empty bin
In this rule, the system adds stock to a bin that already holds stock. The maximum stock quantity in the bin can be controlled by activating the capacity check in the storage type settings. The system puts stock in the next empty bin if there’s no bin holding the required product or if the bin is full.
4.3)- Consolidation group
This rule is used to group HUs based on consolidation groups. The consolidation group is created when the first HU is put away into the storage type. The follow-up HUs with the same consolidation group (based on the ship-to party) are put in the same bins. This rule is mostly used for packaging work centers to group HUs that need to be shipped together.
4.4)- General storage area
This rule allows additions to stock in a bin without any restriction on HU type, product, and so on. The entire storage type consists of one bin that stocks all the products.
4.5)- Transit warehouse: staging area for door
This rule is used in transit warehousing scenarios. If the HU being moved during transit warehousing belongs to a delivery for which the TU is already at the door, the system suggests the corresponding door bin.
5)- Additional Stock Forbidden
The value in this field determines whether additional stock is permitted in an existing bin in a storage type. The selection options available in this setting are as follows:
- Addition to Existing Stock Permitted
- Addition to Existing Stock Generally Not Permitted
- Product Put away Profile Decides
If we don’t want to continue to add similar stock in a bin after the first put away, we will set the rule to the second option. If we select the third option, the value set in the product put away profile determines whether additional put away will be allowed.
Note:
Put away profile is set for the put away control indicator (PACI) and Storage Type under the below path
SCM Extended Warehouse Management –> Extended Warehouse Management –> Goods receipt Process –> Strategies –> Define Product Put away Profile
The combination of PACI and storage type can influence several settings if the storage type is set to Product put away Profile Decides.
6)- Storage Section Check
This determines the storage section checks during put away. This check is done during automatic bin determination or when a bin is given manually.
7)- Split During Put away
This field controls whether the product can be split into multiple bins if the put away quantity exceeds the total available bin capacity. The first checks the maximum storage type quantity if the Check “Max.St.TypeQty” indicator
is set for the storage type.
- “Split During Put away” – If the available space in the bin is less than the quantity being put away, then the system looks for the value in this field to determine whether a split is required.
- “Do Not Split During Put away” – System looks for the next bin with the required space in the storage type or another bin in another storage type, depending on the search sequence for put away.
- “Product Master Decides” – This helps control the split at the product level rather than the storage type level.
Note: The check for the split happens only for product warehouse tasks, not HU warehouse tasks.
8)- Threshold Addition
The Threshold Addition indicator is set if the Split During Put away indicator details above is set to split the product during put away. The value holds a percentage of the actual bin capacity.
9)- Put away Storage Control
The Ptwy. Stor. CtrI indicator defines which type of warehouse task should be created for put away of a HU with process-oriented storage control.
Note: The value in this field is considered only if we use POSC. Otherwise, the type of task is determined from the “Select HU w/o Storage Process indicator” at the warehouse process type level.
Following values are allowed in this field
- Storage Control: Dynamically Evaluated: The system determines the creation of a product or HU warehouse task based on the value of the Prod/HU WT field while assigning storage process steps to the storage process definition in process-oriented storage control.
- Storage Control: Put away with HU WT: System creates HU WT
- Storage Control: Put away with Product WT: System creates a product warehouse task
we have selected blank for all our Storage Types so it will be Dynamically Evaluated
10)- Warehouse Task Generic
This field determines which destination data is determined when a put away task is created.
Below three values are possible for this field
- Not Generic: Full destination data, Storage type, Storage Section & Bin is determined.
- Storage Type and Section: ST & SS is determined
- Only Storage Type: System only determines the destination storage type during task creation and leaves the Storage Section and Storage Bin fields blank. These fields are populated at the time of warehouse task confirmation. For example, you can maintain this setting for packing stations for which you want the bin to be selected at the time of put away.
11)- Mixed Storage
The Mixed Storage field controls whether multiple HUs and products are allowed in a storage type.
- Mixed Storage without Limitations: system allows multiple products and multiple HUs in the storage bin.
- Several Non -Mixed HUs with the Same Product/Batch: system allows multiple HUs with the same product or allows the same product with the same batch (if the product is batch-managed) in a storage bin.
- Several HUs with Different Batches of the Same Product: The system allows multiple HUs in the storage bin of the same product and multiple HUs with different batches of the same product if the product is batch managed.
- One HU Allowed per Bin: The system allows only one HU per bin.
12)- Mixed Storage in Handling Unit
field controls whether multiple quants can be stored in an HU.
Note: If we want to put away unpacked goods, then each bin acts like a HU, making this field relevant for bins.
Below are the options for this field
- Mixed Storage Not Allowed
- Several Batches of the Same Product per HU
- Mixed Storage without Limitations in HU
13)- Quant Addition to Stock Goods Receipt Date
allows to receive quants with a different goods receipt date in the same bin or HU, if additions to existing stock in the storage type is allowed.
The available options for this field are as follows.
- Allowed – Most Recent Date Dominant
- Allowed-Earliest Date Dominant : The system allows putaway of stock and updates the goods receipt date on new stock being put away to the oldest goods receipt date on the stock that was originally present in the bin or HU.
- Not Allowed : Not allowed to putaway into a bin or HU if GR date of current stock & new stock is different.
- Product Putaway Profile Decides
14)- Quant Addition to Stock Shelf-Life Expiration Date
This setting allows you to receive quants with a different shelf-life expiration date in the same bin or HU if additions to existing stock in the storage type is allowed.
The available options for this field are as follows.
- Allowed – Most Recent Date Dominant
- Allowed-Earliest Date Dominant: The system allows put away of stock and updates the shelf-life expiration date on new stock being put away to the oldest goods receipt date on the stock that was originally present in the bin or HU.
- Not Allowed: Not allowed to put away into a bin or HU if shelf-life expiration date of current stock & new stock is different.
- Product Petaway Profile Decides
15)- Quant Addition to Stock Alternative Unit of Measure
The value in this field is used to set the correct UoM if the addition of stocks with different bases and AUoMs is allowed in the bins in the storage type.
The available options for this field are as follows.
- Allowed – First Alternative UoM Dominant: The system allows put away and updates the first AUoM on the stock.
- Allowed-Manage Stock in BUoM Only: The system allows but continues to keep the stock in BUOM only.
- Not Allowed: The system doesn’t allow put away if the current stock has a different UoM than the BUoM.
- Product Put away Profile Decides
- Partly Allowed-Manage Stock in AUoM.
16)- Identification Point Active
If the ID Point Active checkbox is selected. then an ID point is set for the given storage type. The stock is then routed through the ID point before it moves to the final put away location.
Note: An identification point (ID point) is an intermediate storage space in the warehouse where a product is kept for identification and labeling before it’s put away. This is used in LOSC.
if this is selected and an HU is to be put away, then a product warehouse task is created to move stock from the HU into the product, which is then moved into the final storage bin.
17)- Do Not Put away Handling Units
We have configured this for our below storage types
18)- Check Maximum Storage Type Quantity
System checks the maximum quantity for the product in the storage type before putting away. If quantity exceeds the maximum storage type capacity for that product. then put away bin determination moves to the next storage type in the storage type search sequence.
19)- Delete Stock Identification
This indicator is used to delete stock identification after a product is put away into the final storage type. so, this indicator must be set for all final Storage Types.
20)- Search Rule Empty Bin
This is used if we want to put stock in empty bins. There are three options
- Sorting According to Definition: The bins are sorted according to the value specified in the Sort field in the bin master data.
- Near to Fixed Bin: The bins are sorted based on their nearness to fixed bins for the product.
- Product Decides: Sort sequence is determined based on the “Emp. Storbin Sch.” field in the St. Type Data tab of the product master.
21)- Level: Addition to Stock
This field controls at which level stock is added during warehouse task creation for put away. The options are
- Addition to Stock at Bin Level: This value allows you to add stock at BIN level i.e. destination HU field remains blank, and we can select HU of our choice to put the stock in put away. So, we have flexibility to choose the destination HU in which to add stock based on accessibility and proximity
- Addition to Stock at Highest HU Level: Here system propose the HU into which stock will go. Operator than need to go to ST, identify the HU and put stock into the HU to complete the put away
Note: The value in this field is considered if you allow additions to existing stock in a bin.
22)- Capacity Check
The product capacity in product master (Dimensionless) is compared to the maximum bin capacity, which is maintained at the BIN master or BIN type Level. Now there are 4 options
- No Check According to Key Figure : Though capacity check is not performed as per this option but still capacity check based on maximum weight
- Check According to Key Figure Product : System checks the capacity consumption of the product based on the capacity maintained in the Units of Meas. tab in the product master.
- Check According to Key Figure Packaging Material : System checks the capacity consumption based on the HU being put away.
- No Check against Key Figure, Weight, and Volume : No check based on capacity key figures at the bin level. The system still performs a check based on maximum weight and volume if they’re specified at the bin master or bin type level. This setting is ideal for work centers or staging areas.
23)- Early Capacity Check
System checks the max capacity of the bin type before looking for the capacity of individual bins in the bin type. The
system rules out bin types for which maximum capacity is less than the capacity of the product or HU being put away.
24)- Put away Quantity Classification
“Put away Qty Class” describes the packaging unit in which a product is stored in the warehouse.
Note: In rounding config described below, system checks the value maintained in the PutawayQtyClass field to ensure that only allowed units are put away in the storage bin. Thus, for a storage type, if the put away quantity classification is maintained at the case level, the system rounds off the warehouse task quantity to a few cases, and then the cases are moved to different bins.
25)- Rounding after Split
The options available are as follows
- No Rounding: With this setting, the split quantities aren’t rounded off. Thus, the entire rounded quantity is added to the storage bin as is.
- Round Down WT Quantity to a Multiple of a Unit: System rounds down the warehouse task quantity based on the put away quantity classification.
Note: This setting is considered if storage type settings allow split during put away. The system checks the bin capacity before finalizing the split quantities to ensure that the additional rounded off quantities can be included in the bin.
26)- Mixed Stock Type
If selected, then only products & batches with similar stock type (UNR, QI, Blocked) can be stored in the bin or HU
27)- Mixed owners
If selected, then only products & batches with same owners can be stored in the bin or HU
28)- Mixed Parties Entitled
If selected, then only products & batches with same parties entitled to dispose can be stored in the bin or HU
29)- Mixed Inspection Documents
If this indicator isn’t selected, then the system allows stock with different inspection documents in the storage bin or HU, otherwise, it will only allow single inspection stock.
30)- Mixed Special Stock
If this indicator isn’t set, system allows materials with different special stock indicators in the same storage bin or HU. If this indicator is selected, then system will only allow groups of materials assigned to the same special stock indicator.
31)- Mixed Alternative Units of Measure for the Same Product
If this indicator isn’t set, then the system allows the same product and same batch with different AUOMs in the storage bin or HU.
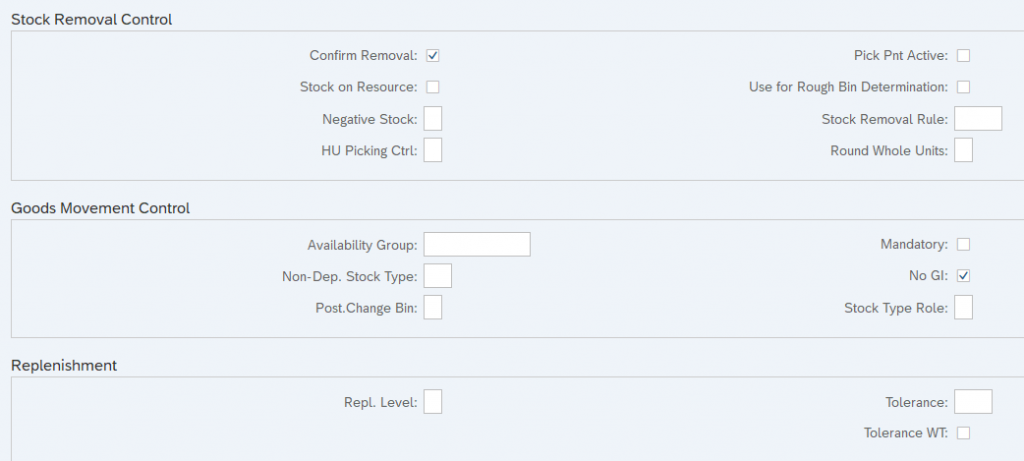
1.1.3 Fields in “Stock Removal Control” Section of Storage Type Configuration
Stock removal can include picking for sales orders, stock transfer orders, consumption orders, or bin-to-bin transfers. You can also create picking strategies that determine the order in which bins will be selected for picking in the storage type.
below are the fields available in this section
1)- Confirm Removal
If selected, then stock removal requires confirmation of warehouse tasks before stock is reduced from bin. If not set, then stock is removed from ST as soon as the warehouse task is created.
We have configured this for all our storage types
2)- Stock on Resource
If this indicator is selected, then system considers the stock on a forklift (for example) like a pallet picked from bulk storage that’s en route to the pick point or deconsolidation center.
3)- Negative Stock
Negative stock is stock below the available quantity. The options available are
- Negative Stocks Not Allowed: In this option system will throw an error if available qty is less then picked qty.
- Negative Available Quantity Allowed: in this option stock removal task will be created, if picked qty is less then- the available quantity + quantity scheduled for put away in open put away warehouse tasks with destination bins set as the bin from which stock removal is being planned.
- Negative Stocks Allowed: Stock removal task is allowed to create from the bin even if available qty is less the picking qty, but confirmation can only be done if available qty is more than the picking quantity.
4)- Handling Unit Picking Control
The HU Picking Ctrl indicator controls how a full pallet being picked should be affected if it matches the required pick quantity.
The options available are as follows
- Adopt Source HU with Lower-Level HUs into Pick HU : The source HU is selected as the lower-level HU into the pick HU when the picking task is confirmed.
- Propose Source HU as Destination HU : The source HU becomes the destination HU upon picking warehouse task confirmation.
- Warehouse Process Type Controls Proposal for Destination HU : How the source HU will be affected when picked is determined by the value of the Control for HU Pick setting in the warehouse process type.
- Only Adopt Contents (Prod. and Lower-Level HUs) into Pick-HUs : Only the products in the source HUs and any lower-level HUs are included in the pick HU. This option is used only if the product or lower-level HUs are to be picked from the issuing HU.
5)- Pick Point Active
Pick point indictor is used for a ST for which pick point is active
Note: A pick point is an intermediate location where HUs are placed for picking, packing, or inspection. The picked quantity is moved to a pick HU (if pick HUs are used), while the rest of the pallet is moved back.
6)- Use for Rough Bin Determination
system determine the source ST based on stock removal strategies and filled in warehouse request line item as soon as it is created.
Note: This setting is used in combination with order-related replenishment, in which the replenishment quantity is calculated based on the rough bins determined in open orders. The replenishment then can be run to make the required stock available in the required bins, and the warehouse picking request can be completed.
7)- Stock Removal Rule
Here we give the various stock removal rules that allows the system to sort the quants in order of preference for picking
Note: The stock removal rules are also set at the storage type search sequence level and storage type group level. The system only looks for stock removal rules at the storage type level if they’ re not maintained either of these two places.
8)- Round Whole Units
Stock can be from ST in full pallets, cases or EA depending on ST.
- No Rounding : No round off is done
- Round Down WT Quantity to Single Unit : Rounded off to a single unit. For example, for multiple full pallet picks, the system creates a separate warehouse task for full pallets.
- Round Down WT Quantity to a Multiple of a Unit : Quantities in a warehouse task are rounded off to a multiple of a unit. For example, the entire pick quantity is rounded off to multiples of cases or pallets, and the remaining quantity is moved to a different warehouse task for picking from a different storage type.
- Round Up WT Quantity to a Multiple of a Unit : Quantities in a warehouse task are rounded up to a multiple of a unit. The remaining quantity can be moved back to storage or moved to a different storage area created for storing loose cases.
We have configured this for our below storage types
1.1.4 Fields in “Goods Movement Control” Section of Storage Type Configuration
These settings controls how goods movement happens in the storage type. Below picture shows the different settings available

1)- Availability Group
It controls the availability of stock in the storage type.
You can read about this in details HERE
2)- non-location dependent Stock Type
This field controls the availability of only a certain non-dependent stock type (UNR, QI, BLK, RTN) in ST.
You can read about this field in detail HERE
3)- Posting Change Bin
This controls whether stock should move to another bin if a posting change is made to a quant. The options are
- Posting Change Always in Storage Bin: In this option stock will not move to another bin at posting change
- Posting Change According to Mixed Storage Setting: if the storage type setting doesn’t allow multiple stock types in the storage bin, then a warehouse task is created to move stock to another storage bin.
- Posting Change Never in Storage Bin: System always create a WT to move stock to another bin if a posting change happens in ST
Note: For option “Posting Change Always in Storage Bin”, If put away settings don’t allow mixed stock types in the same bin, this setting will gain preference, and the system will allow bins to have stock with different stock types even if a posting change only occurs for partial stock in the bin.
4)- Mandatory
if this indicator is selected then system allows only stocks with availability group in the storage type.
Note: This setting is very important to change the stock IM SLOC from “Received on DOCK” to “Available for Sale”
5)- No Goods Issue
With this setting, system does not allow goods issue from this SLOC. This is set for final put away storage types.
6)- Stock Type Role
This field is used if we want to store only a particular stock type in the storage type. If stock of a different stock type is moved into the bins in the storage type, then the stock type is changed to the stock type defined in this setting.
Note: You can use this setting for storage types reserved for scrapping. The stock type role can be set to scrapping stock, and any stock then moved to this storage type will be moved as scrapped stock.
1.1.5 Fields in “Replenishment” Section of Storage Type Configuration
The Replenishment section includes storage type settings for controlling replenishment. Replenishment is used to fill stock in a picking area so that it reaches a minimum required threshold level and can be used for direct picking.
1)- Replenishment Level
This determines the level in the storage type from which the stock levels will be read when replenishment tasks are being created to fill stock in the storage type. The options available are
- Storage Bin Level for Fixed Bins: Stock levels for replenishment are calculated at bin levels for fixed bins allocated to a product. Based on these, the replenishment tasks are created to pick stock from reserve storage types
- Storage Type Level: Stock quantities will be calculated for all the bins in the storage type.
2)- Tolerance
if replenished quantity is less than the replenishment request but more than the tolerance level (defines in percentage), the warehouse replenishment tasks are completed.
1.2 How to create Storage Type in EWM
Storage types are created in EWM through configuration
Follow the below path to configure storage type
SPRO –> SCM Extended Warehouse Management –> Extended Warehouse Management –> Master Data –> Define Storage Types
Create all your storage locations through the above given path
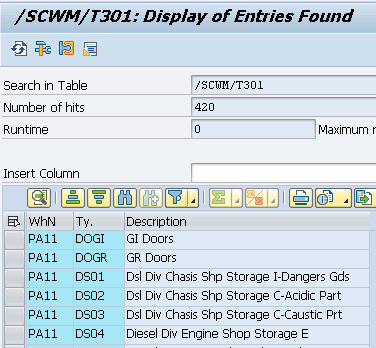
1.2.1 Storage Type Table
EWM Storage types are stored in database in table “/SCWM/T301”
1.2.2 Other Important EWM Storage Type Tables
/SCWM/T301G –> Storage Type Groups
/SCWM/T301GT –> Storage Type Groups: Description
/SCWM/T301M –> Assignment of Storage Type Group – Storage
/SCWM/T301T –> Storage Type Descriptions
/SCWM/V_T3010 –> Define Storage Types
/SCWM/V_T3010SSC –> Maintain Storage Types
/SCWM/V_T301M –> Storage Type Group Assignment
2. Storage Type Group
Storage type groups are groups of two of more storage types. We can assign a storage type to more than one storage type group.
We have created below ST groups for our car business warehouse
SPRO –> SCM Extended Warehouse Management –> Extended Warehouse Management –> Master Data –> Define Storage Types
Note: When we create a put away Warehouse Task, if Storage Type Group does not consider the shared quantity of the product across all grouped Storage Types & During put away, the product is put away despite of maximum storage type quantity is exceeded. Then please check flag “MxStTyQty” to avoid the product put away into the storage type if the maximum storage type quantity is exceeded for the product.
3. Assign Storage Types to Storage Type Groups
In this configuration we will assign Storage types to storage type groups
In the previous steps we have configured storage type groups & storage type. Now assign storage types to the storage type groups through below path.
SPRO –> SCM Extended Warehouse Management –> Extended Warehouse Management –> Master Data –> Assign Storage Types to Storage Type Groups
🔍 Explore the Complete S/4HANA–EWM Integration Series
If you’re working with EWM processes like WPT, ST, LOSC, POSC, or warehouse execution, understanding how EWM connects with S/4HANA is essential. This 7‑part integration series explains the full technical flow, mapping logic, document integration, and real‑world configuration steps that every EWM consultant should know.
- Technical Connectivity Between S/4HANA & EWM
- ERP‑Side Settings for EWM Integration
- EWM‑Side Settings & Warehouse Setup
- Stock Type, Availability Group & Mapping Logic
- ERP → EWM Document Integration Flow
- Extra Steps for Decentralized EWM on S/4HANA
These posts will give you the complete picture of how EWM interacts with S/4HANA behind the scenes — a must‑have foundation for mastering any advanced EWM process.
Image by aleksandarlittlewolf on Freepik


