
A good understanding of EWM Master Data is mandatory for EWM consultants. Master data plays a vital role in the correct execution of different business processes.
This is applicable for both options -S4 HANA embedded as well as decentralized EWM on S4 HANA.
You may go-through the below five posts (in sequence as given below) to have a greater understanding of EWM
1-S4 HANA EWM System Connection: basic Settings in 3 Easy Steps
2-An Ultimate Guide for Initial S4 Settings to Configure EWM
3-How to Integrate SAP EWM Warehouse in 7 Easy Steps
4-Understanding Storage Types in EWM
5-Understanding EWM Warehouse Process Type
Below is the anchor post which explains all the steps required to configure Embedded as well as Decentralized EWM in S4 HANA

Configure EWM in SAP S4 HANA
Now let’s review each EWM master data element in detail in order to have great Understanding of EWM Master Data
1. Define Storage Sections
A storage section is a subdivision of a storage type. It joins storage bins that have similar attributes.

We have created below storage sections for our car business warehouses. Please see below screenshot to have an idea.

You can download the full list of storage section created for our warehouse PA11 in excel from the resource page HERE (We have configured 109 Storage sections for our car business).
🔍 Explore the Complete S/4HANA–EWM Integration Series
If you’re working with EWM processes like WPT, ST, LOSC, POSC, or warehouse execution, understanding how EWM connects with S/4HANA is essential. This 7‑part integration series explains the full technical flow, mapping logic, document integration, and real‑world configuration steps that every EWM consultant should know.
- Technical Connectivity Between S/4HANA & EWM
- ERP‑Side Settings for EWM Integration
- EWM‑Side Settings & Warehouse Setup
- Stock Type, Availability Group & Mapping Logic
- ERP → EWM Document Integration Flow
- Extra Steps for Decentralized EWM on S/4HANA
These posts will give you the complete picture of how EWM interacts with S/4HANA behind the scenes — a must‑have foundation for mastering any advanced EWM process.
2. Define External Storage Process Step
In this configuration, we will define the external process steps to be used in our warehouse. External process steps are linked to internal storage process steps and multiple external process steps can be assigned to a storage process.
We have configured 46 external steps for our warehouse
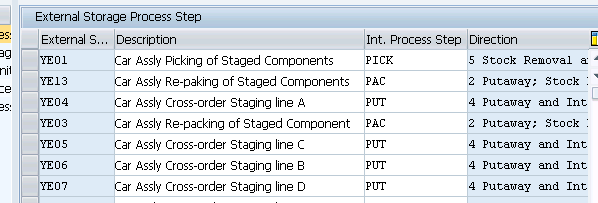
You can download all the 46 steps in excel from our resource center HERE
2.1 Characteristics of External Process Steps
Below are the characteristics of external process steps
2.1.1 Assigned to Internal Step
An external step is assigned to SAP predefined internal step which is hardcoded and can not be customized.
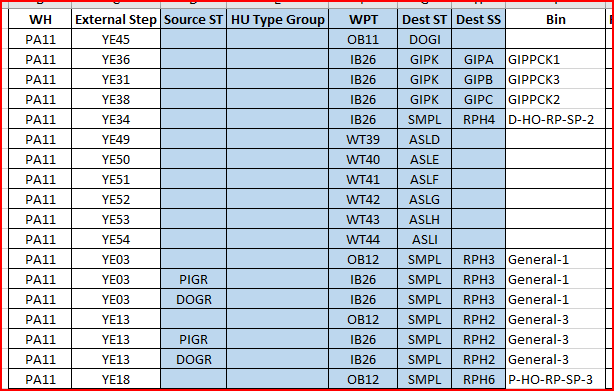
2.1.2 Source & Destination Storage type
We can define source & destination storage type for a storage process step.
--> Destination Storage Type/ Storage Section & Storage BIN in a step is defined if we do not use Rule based determination (Checkbox in external step configuration).

Rule based means
--> System is picking Destination details from some other setting for example
*** For a put away process destination data is coming from the SAP Easy Access settings "Staging Area and Door Determination (Inbound)" -/SCWM/STADET_IN
*** For a Packing step destination data is coming from the SAP easy access transaction "Define Work center Master Data" /SCWM/TWORKST
Note:
If We have checked the check-box for the field “Rule-based” for the storage process steps Quality Inspection or Value-Added Service, then we need an extra storage process step in our POSC. This step must contain the destination location.
- For Quality Inspection process step is must to define the quality inspection work center for an inspection rule.
- For Value-Added Service, assign the storage process step to determine the VAS work center of the packaging specification
We have defined 56 external steps with source ST, destination Storage Type, Storage Section, destination bin depending upon the requirement
You can download the full configuration of all the 56 steps in excel from the resource center HERE.
See below the screenshot from the excel
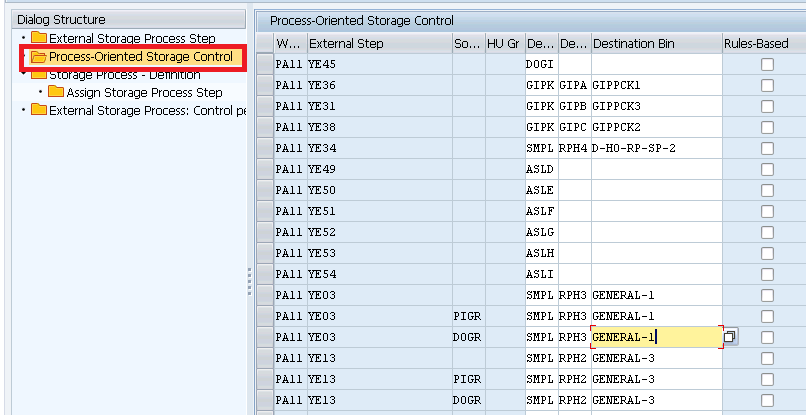
Download the full configuration of all the 56 External process Steps in excel from the resource center HERE.
3. Work Center
A work center is where we can perform packing, deconsolidation or weighing activities. We assign the work center to a storage type, and more than one work center can be assigned to a storage type.
Storage type assigned to a work center has a role of the work center, pick point or pick point and identification.
3.1 Specify Work Center Layout
Work center Specifies which functions should be available for a work center along with which tab pages should be displayed.
We have configured below 6 Work center layout for our warehouse.
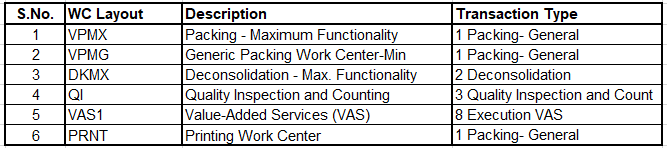
You can download the excel containing all fields and their configured values in the excel from the resource center HERE
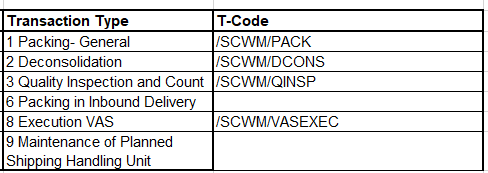
3.1.1 WC Transaction Type & Display T-code
Please note that there are different t-codes to display WC depending on the transaction types used in work center layout
There is total 6 transaction types in Work center layout. Please see below t-code against each transaction type
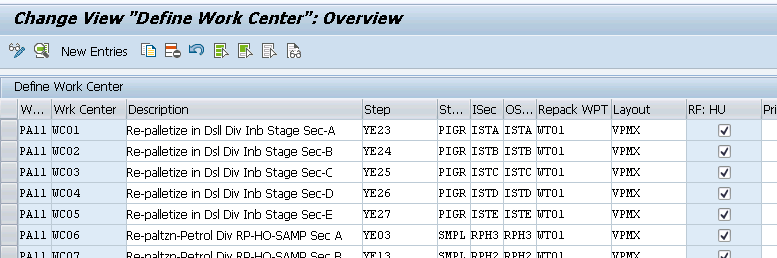
3.2 Define Work Center
In this configuration we will configure work centers.
Each work center must be assigned to a storage type, and a storage bin.
Please note that storage BINS are not assigned to work centers through SPRO. This is done through SAP easy access as per the below path and this is must.
--> Extended Warehouse Management -> Master Data -> Work Center -> Define Master Data Attributes.

--> Storage Types with role 'Work Center' (E), 'Pick Point' (B), 'Work Center in Staging Areas Group' (I) or 'Identification and Pick Point' (C) can only be defined as work center.
A work center has the following attributes:
- A Work center can be assigned an inbound section or outbound section
- Can store an external storage process step in case of POSC is being used. This decides the process step for an HU when ‘Close HU’ function is chosen in the work center.
- Can store WPT for the repacking transactions , if we do not want to use the proposed WPT from Warehouse Number Control.
- Can store a return storage type and a return storage section, in case of work center is used as a pick point.
We have defined 24 work centers for our car business warehouse.
You can download all the 24 WCs configured in excel with all the fields. Please see the excel screenshot below

You can download the excel from the resource center HERE
--> Now we need to associate Storage BIN with every work center in /SCWM/TWORKST
3.3 Optimize Work Center Determination in Goods Issue
We define the work center determination in SAP easy access transaction /SCWM/PACKSTDT (Determine Work Center in Goods Issue)
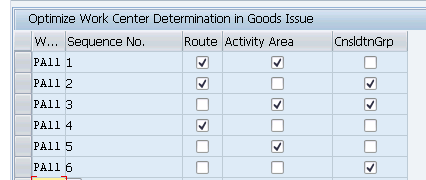
3.3.1 Determination of work center
Work center is determined as per the below
First system tries to find work center in POSC external steps. System picks the ST & BIN from the external step and look for the assigned work center in the table /SCWM/TWORKST
Work Center Determination is a combination of the below

-->1) in SPRO we can input Storage Type, Inbound & Outbound storage section & step corresponding to a work center. Please note here Repack WPT is given.

-->2) in SPRO we can input destination Storage Type, Destination storage section & bin in external process step configuration.

-->3) Maintain the Storage BIN corresponding to the work center in the transaction /SCWM/TWORKST (Work Center: define Master Data Attribute). WC appears here as soon as you configure the same in SPRO,

-->4) Combined information from step 1 & step 4 can be found in the table /SCWM/TWORKST.

--> 5) System searches for work center with the combination of the given storage type and bin read from the step 2 in table /SCWM/TWORKST

--> 6) If the WC determination via the storage bin is not successful (~ bin from POSC step is not maintained in any of the work centers) then system take the storage section of this bin.

--> 7) system tries to find a work center from table /SCWM/TWORKST with the section read in step 6 as inbound section. If this is still not successful
 then system tries to find a work center from customizing table /SCWM/TWORKST with the same section read from step 6 as outbound section.
If not found, then system look for the “Determine Workcenter” checkbox in WOCR.
If we have checked this indicator “Determine Workcenter” (in the used warehouse order creation rule), system uses our criterion to determine the work center as per screenshot shown below
4. Define Staging Areas
5. Define Activity Area
Activity area are logical area of the warehouse, which groups storage bins together with regards to specific warehouse activities like: Put-away, Picking, Physical Activity etc.
Note: An activity area is used to group warehouse tasks into warehouse orders, which are then assigned to resources. Activity areas are also used for bin sorting based on activity area and activity. We can perform multiple activities in an activity area. An activity area also can include bins from multiple storage types.
--> Warehouse Request items represents workload for a warehouse.

--> Waves break this workload into small workloads to be executed in a given timeframe & convert these into Warehouse Tasks (WTs) upon release.

--> Now WOCRs group these WTS into a Work Order (WO) which are assigned to Queues as per Queue determination rules & these Queues are assigned to resources (Manpower, Forklift etc.)

--> From the above, it is clear that our WH resources will be utilized through queues. Activity areas plays a big role in determining the queues. so, it is a bottom-up approach - choose activity areas wisely (careful study of the efficient deployment of manpower in the different areas of warehouse as per workload of respective area) so that we can efficiently determine the queues which in turn will enable us to utilize the WH resources wisely.
5.1 How to determine the AA efficiently
To determine the activity area efficient let’s first study the layout our warehouse
5.1.1 Layout of our Warehouse
Below are the main area of our car business Warehouse
5.1.1.1 Inbound Area
- Diesel Div Inb Stage Section -A
- Diesel Div Inb Stage Section -B
- Diesel Div Inb Stage Section -C
- Diesel Div Inb Stage Section -D
- Diesel Div Inb Stage Section -E
5.1.1.2 Storage Area as per WH layout
5.1.1.3 Handover areas from WH to Production
- Petrol Div RP-HO-SAMP Section A
- Petrol Div RP-HO-SAMP Section B
- Diesel Div RP-HO-SAMP Section A
- Diesel Div RP-HO-SAMP Section B
- Diesel Div RP-HO-SAMP Section C
- Petrol Div RP-HO-SAMP Section C
- Petrol Div RP-HO-SAMP Section D
5.1.1.4 Supply (Staging) to Production
- Supply to Car Assembly Line- A
- Supply to Car Assembly Line- B
- Supply to Car Assembly Line- C
- Supply to Car Assembly Line- D
- Supply to Car Assembly Line- E
- Supply to Car Assembly Line- F
- Supply to Car Assembly Line- G
- Supply to Car Assembly Line- H
- Supply to Car Assembly Line- I
5.1.1.4 Goods Receipt from Production
- GR from Production Car Model C
- GR from Production Car Model D
- GR from Production Car Model B
- GR from Production Car Model E
- GR from production Car Model F
5.1.1.5 Goods issue Zones
- Petrol Div GI-Packing – Section A
- Diesel Div GI-Packing – Section A
- Petrol Div GI-Packing – Section B
--> We have studied our WH and found those areas where our WH resources are executing the activities like - Put away, picking, staging for production, replenishment, stock checking etc. parallelly. We will create these areas as "Activity Area" for our WH
5.2 How we created Activity Area for our WH
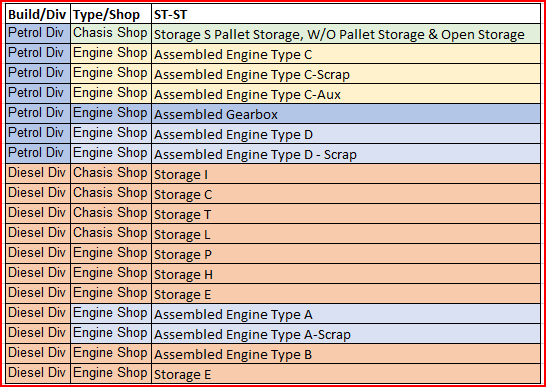
For example- Two separate resources are working parallelly for PTWY of Bins of PT08 (Petrol Div Engine Shop Assembled Engine Type D) & INTL, REPL & PICK activity for Bins of PT04. So we decided to create two separate Activity Area for this

Like this we have created 38 activity areas accordingly.
--> Please note that the above is just to have an idea of how many activity area should be created as a bird eye view level.

--> It is not hard and fast that WH resource will work only for PT06 & PT08, there are some area also where resource is capable and work as and when required. So we need to assign those STs also to the Activity areas. This will be done in next section.
You can down load the full list including all the fields in excel from the resource center HERE

5.3 Generate Activity Areas from Storage Type
Through the report /SCWM/R_AREA_LGTYP_CREATE., we can create the activity areas 1:1 from the storage types automatically. In the above section all the activity area corresponding to storage types are created automatically and description was given by system

Note : Once we have generated an Activity Area for all activities, a generic sort sequence is automatically created for every combination of storage type & activity If we create manually activity area corresponding to a storage type as we did in the above configuration, system will not automatically insert our warehouse entry into configuration “Assign Storage Bins to Activity Areas” & “Define Sort Sequence for Activity Area”
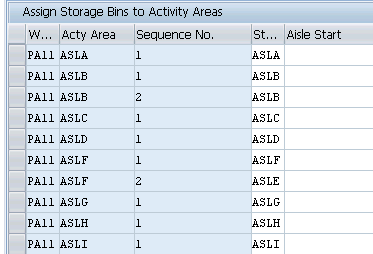
5.4 Assign Storage Bins to Activity Areas
Here we will Implicitly enter the storage type i.e. we will enter only the storage type and leave all the remaining fields empty. The system specifies the storage bins using the storage type, and assigns all storage bins within this storage type to the activity area.
Note : If we have generated activity area through configuration node “Generate Activity Areas from Storage Type” then system will insert this automatically

Since we have created three activity area which is not 1:1 with Storage types so we need to manually insert these activity area in the above config in order to assign bins
Since we have created three activity area which is not 1:1 with Storage types so we need to manually insert these activity area in the above config in order to assign bins
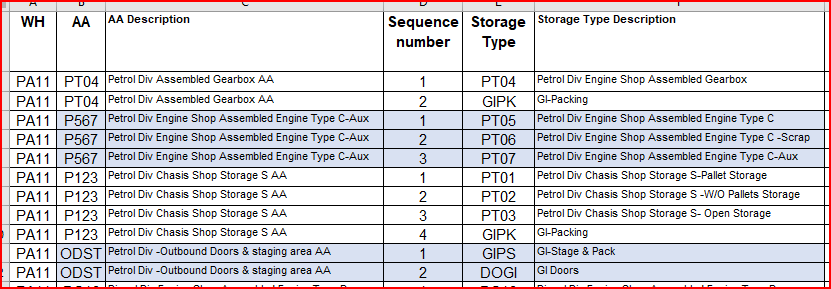
For example – Activity area PT04 (Petrol Div Assembled Gearbox AA) will be assigned to the ST PT04 (Petrol Div Engine Shop Assembled Gearbox) & GIPK (GI-Packing)
We have configured 110 lines of the configuration of storage type assignment to activity area for our WH PA11. You can download the full excel containing all the fields from the resource center HERE
Screenshot of the configuration is the system
5.5 Define Sort Sequence for Activity Areas
Once we assigned storage types to activity area as per the previous section, we can now configure the sorting rules within an activity area for all activities.
This configuration is mandatory for storage bin sorting. Without sorting it is not possible to use storage bins in EWM.
Recall how we have determined the activity area
Activity areas should be the break-up of the warehouse area where WH resources can work parallelly. While assigning the Storage BINs (Storage Types) to activity areas, we should also consider the possible storage type(s), where respective resource is capable and can be allowed to execute the WH activities. In this configuration we will go one step further and also consider the resources current & possible activities.
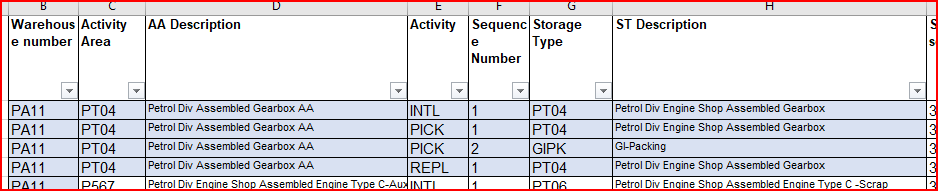
For example – as per our excel of WH activity definition, activity area PT04 is responsible for INTL activity of PT04, REPL activity for PT04 & PICK activity of PT04 ST & BIN GIPACK2 (ST GIPK)

So, we have configured this configuration (Define Sort Sequence for Activity Areas) for activity area PT04 as per the below screenshot from the excel
You can download the full excel for the configuration “Define Sort Sequence for Activity Areas” from the resource center HERE.
This excel contains 281 lines of this configuration for our WH PA11.
6. Resource Management
Here we will configure resource related activities one by one
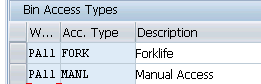
6.1 Define Bin Access Types
We have configured two bin access type for our WH
Bin access type is than assigned to Storage BIN master data & resource type.
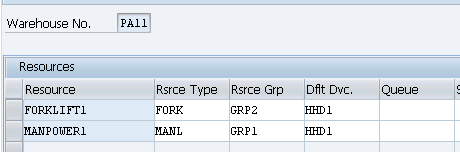
6.2 Define Resource Types
Here we define the resource which includes Bin access types
Resources are assigned to the resource types through SAP Essy Access through below path

Extended Warehouse Management -> Master Data -> Resource Management -> /SCWM/RSRC - Maintain Resource)
We have defined the below 4 resource type for our WH
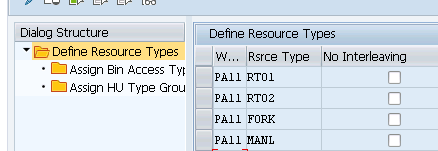
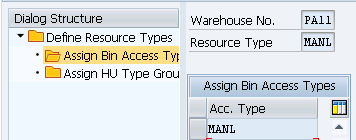
now we will assign BIN access type to resource type “FORK” & “MANL”

6.3 Define Queue Types
Here we define the queue types in the warehouse.
Generally, Queue types are the main activities of the warehouse
For example, we have configured below queue type for our WH
You can download the full list in excel from the resources center HERE
6.4 Define Queues
Here we Define the Queues & queue determination criteria for each queue.
All the WTs are assigned to queues for processing.
Work in the warehouse is managed and assigned through warehouse movements (Inbound, Outbound, Replenishment, Production Staging etc.), which is defined by Queues.
Resources and WOs are assigned to queues in order to manage and distribute the work in the warehouse.
6.5 Resource Assignment to Queue
Queues are assigned to resources through two ways
--> We can assign a resource to a specific queue through "Maintain Resource" easy access transaction

--> We can assign resource's group to a sequence of allowed queues through easy access transaction "Maintain Queue Sequence for Resource Group.
Let’s have a look on both ways and the necessary configuration/settings.
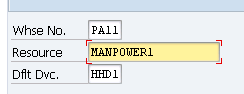
6.5.1 Maintain Resource “/SCWM/RSRC”
We assign a resource to a queue through SAP easy access resource maintenance transaction “/SCWM/RSRC“.
Path is given below
SAP Easy Access screen → Extended Warehouse Management → Master Data → Resource Management → Maintain Resource
Maintain the resource now
Note
We can assign each resource to the resource group & Default device as described below
6.5.1.1 Resource Group /SCWM/RGRP
We can assign then queue to resource group level also instead of assigning the queue to each resource.
We have created below resource group for our WH PA11 through SAP easy access transaction /SCWM/RGRP
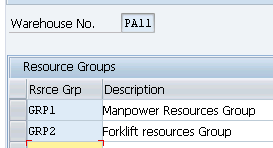
In such a case, the assigned queue is given precedence over the others in the queue sequence, for the purposes of WO selection.
6.5.1.2 Default Device
You need to maintain default device for this transaction through SAP Easy Access transaction /SCWM/PRDVC –> Maintain Presentation Devices

Once you have maintained the resources, we need to main the user
6.5.1.2.1 Maintain user /SCWM/USER
If we logon through with user maintenance done, then on login to RF below screen will be presented.
That means Warehouse number, resource & default device will be preselected as per the settings done in maintain user transaction.
Note: We can create a user as a recourse in several warehouses, but you have to create the same resource as a user only in a single warehouse.
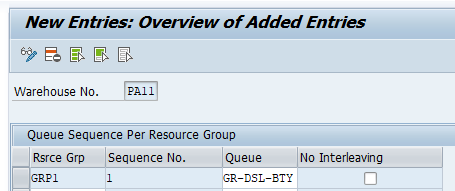
6.5.2 Maintain Queue Sequence for Resource Group /SCWM/QSEQ
Though this SAP Easy access transaction we assign/unassign a resource group to/from a queue.
If more than one WO is assigned to the resource, the list of possible WOs for selection is sorted in the following order:
WOs belonging to the resource’s assigned queue
WOs belonging to the resource group’s assigned queues, according to the defined queue sequence.
WOs that do not belong to any queue
If more than one WO falls within any of these queue classifications, the WOs are sorted as follows:
- In ascending order, by latest starting date (LSD)
- In descending order, by execution priority.
6.6 Warehouse Order Assignment to Queue
Warehouse orders are assigned to the queues as per the queue determination configuration.
As explained above Activity areas plays a big role in queue determination. Activity area along with WPT can break up a high-level task let’s say inbound from external vendor to several executable queues. These queues than manage and distribute the work in the warehouse.
Example
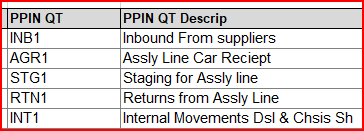
For our WH PA11, bellow activities are performed at a very high level
6.6.1 High Level Activities in WH PA11
- Inbound From suppliers
- Assembly Line Car Receipts
- Staging for Assembly line
- Returns from Assembly Line
- Internal Movements Dsl & Chsis Sh
- Outbound to Customers
- Physical Inventory
So, for the activity inbound from suppliers below Queues are created
6.6.1.1 Queues created for “Inbound From suppliers “
According to the resources available & distribution for this activity we have created below queues for this activity
1-Ext Good Recpt Diesel Div
2-Ext Good Recpt Diesel Div- Spares
3-FG PTWY Petrol Div
4-FG PTWY Diesel Div
5-Spare returns -Diesel Div
6.6.1.1.1 Ext Good Recpt Diesel Div
this queue is used mainly for the WTs created between “Diesel Div -Inbound Doors & Staging Area” to 13 different storages of the WH. So, in the queue determination we will give source AA & destination AA accordingly to determine this queue.
Let’s assume a group of three peoples are working for external goods receipt for diesel division. Now all three peoples are created as manual resources in the system and queue is assigned to them through Maintenance Resource transaction “/SCWM/RSRC” or to their resource group
or all the three resources can be combined under a resources group and then queue is assigned to that resource group
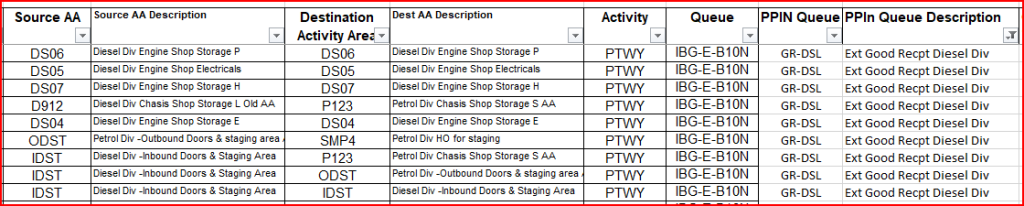
We have configured 204 lines of queue determination.
You can download all 204 lines in excel with all fields from the resource center HERE
We have configured all the 204 lines of queue determination. The path to configure queue determination is as below
SPRO –> SCM Extended Warehouse Management –> Extended Warehouse Management –> Cross-Process Settings –> Resource Management –> Define Queues –> Define Queue Determination Criteria

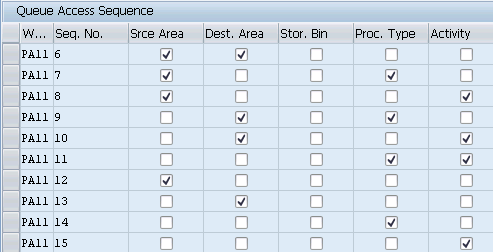
6.7 Define the queue access sequence.
When the system searches for a queue for a WT, the initial search will be with all the relevant WT parameters’ values.
If the search fails, the queue determination table will be read again, according to the next entry in the sequence.
WTs & WOs are assigned to queues according to the queue determination criteria and queue access sequence.
7. Define Storage Bins
In this section we will first do the necessary configuration to create the storage bins and then we will create storage bins
7.1 Define Storage Bin Types
Here we define our storage bin types used in our warehouse.
Storage bins are divided into groups as per attributes like-large bins, small bins).
We have configured more than 50 storage bin type for our warehouse.
Please see example below

You can download the excel containing all the storage type along with their description in the excel from the resource center HERE
7.2 Creation of BINS
Now we will load all the BINs created for our storage types
We have created more than 3000 BINS for our car business EWM WH PA11.
You can download all the bins in excel arranged in format to load directly to EWM
7.2.1 Storage BIN Loading
To load storage bin start /SCWM/SBUP
SAP Easy access path
Master Data -> Storage Bin -> Load Storage Bins
convert the downloaded excel into the CSV format and click on upload
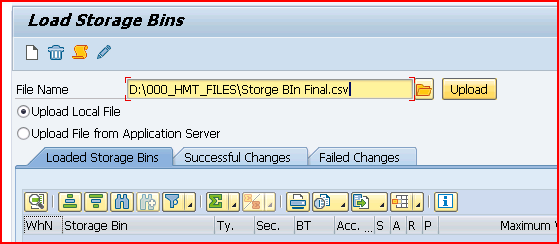
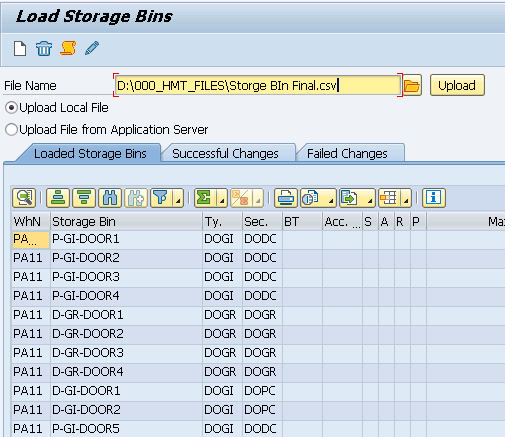
System will show all the storage bins to be uploaded and check log once if all OK and proceed for load
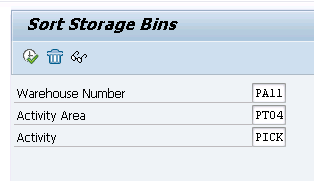
7.3 Sorting of bins
After creation BINS are required to be sorted.
We can do sorting by Activity & Activity area. if we sort by this method than system will sort the BINs of the corresponding storage type for that activity only
We sort the bins through SAP easy access transaction /SCWM/SBST
let’s pick an activity area configured for our WH
Go to the activity area excel (down from the resource center HERE)

We have selected PT04 activity area as per the screenshot shown
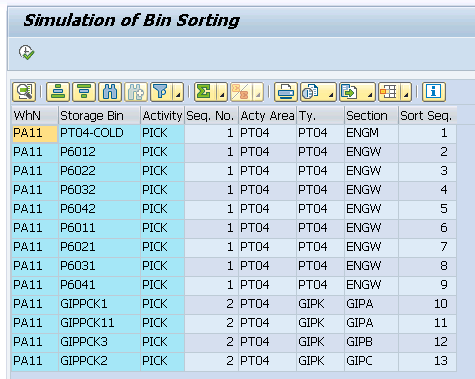
--> From the above excel, note that Activity area PT04 is created for Bins of PT04 (Petrol Div Engine Shop Assembled Gearbox) + BIN GIPACK2 for PICK activity so system will sort BINS of these Storage Types only.
Got o /SCWM/SBST and sort the BINS for PICK activity
7.3.1 Updaate in Storage Bins after sorting
To check the update, display any storage bin which is sorted
run /SCWM/LS03 and input the BIN number press enter and go to “Activity Area” tab
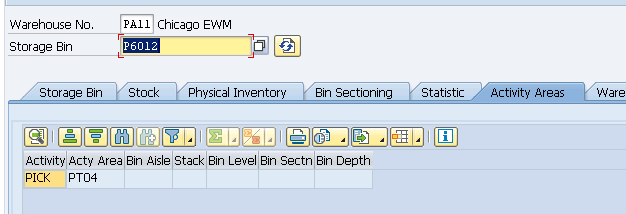
System has market this BIN to be used for PICK Activity in PT04 Activity Area
Now let’s sort everything without restricting on any activity area or activity.
Now all the BINs are present in /SCWM/LGPAS table along with activity & activity area
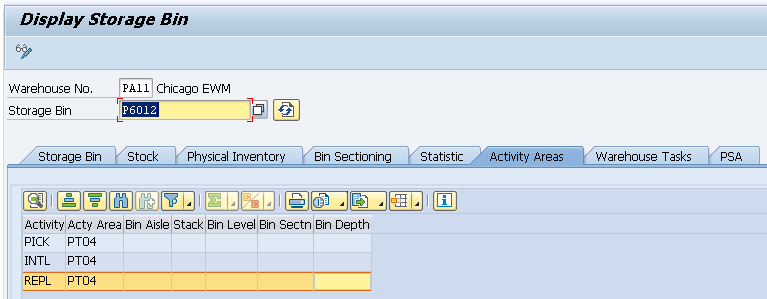
As per our excel of creating activity area, this BIN P6012 belongs to PT04 which is marked or INTL, REPL & PICK activities for the BINs of storage type PT04

Display our BIN P6012 again and system has marked this BIN as per the above explanation
7.3.2 Table /SCWM/LAGPS (Bins for Execution Areas and Activities)
This table get entries with sorting. As we have sorted right now BINs of activity area PT04, so this table holds BINs for the corresponding storage types

8. Define Unit of Measure Attributes
We assign a quantity classification to a unit of measure (UoM). We can also specify whether the UoM is stock-specific or not.
quantity classification is used to determine the storage type search sequence for put-away and stock removal. Based on the requested quantity, the system determines the UoM with the largest conversion factor which is smaller or equal to the requested quantity. The system reads the assignment table with this UoM and uses the resulting quantity classification for the storage type search sequence determination.
We can mark the UoM as stock-specific if UoM is required to associate with the stock. We can only mark UoMs as stock-specific that represent a specific packaging level.
Note : We can’t mark a base UoM as stock-specific.

9. Quantity classification
Qty Classific. describes the different packaging units in which a product is stored in the warehouse. The different packaging units can be eaches, cases, pallets, and so on.
For example, if you pack 12 EA in a case, then you map that quantity to a quantity classification of Case. When a task is created to pick 12 EA from the storage type, the system gets the quantity classification from the packaging specification level that maps 12 EA to a case. This quantity classification is then used in the stock removal search sequence to determine the storage type that holds the right SKU. In addition, quantity classification helps identify the operative unit of measure (UoM) from the packaging specification level. This operative UoM is also the alternative AUoM in the warehouse task.
- The Preferred UoM field is used to specify the preferred UoM at the warehouse level. If this value isn’t specified, the system picks up the preferred UoM maintained at a global level in the Storage tab of the product master.
- Quantity classification@ storage type data level-The data in the Quantity Classif. field is used to determine the operative UoM for the packaging specification and is used during picking if the quantity classification isn’t stored at the storage type level.
The allowed values for quantity classification are maintained via IMG path
SCM Extended Warehouse Management –>Extended Warehouse Management –>Cross-Process Settings –> Warehouse Task –> Define Quantity Classifications
10. Define Storage Groups for Layout-Oriented Storage Control
The storage group for the layout-oriented storage control is a logical or physical breakdown of a storage type. For Example – All storage bins in an aisle are grouped in a storage group, since the goods have to be brought during picking from this aisle to an intermediate storage bin at the end of the aisle
Note : The system uses the storage group for the layout-oriented storage control to determine the intermediate storage type.

Below Storage groups are configured

🔍 Explore the Complete S/4HANA–EWM Integration Series
If you’re working with EWM processes like WPT, ST, LOSC, POSC, or warehouse execution, understanding how EWM connects with S/4HANA is essential. This 7‑part integration series explains the full technical flow, mapping logic, document integration, and real‑world configuration steps that every EWM consultant should know.
- Technical Connectivity Between S/4HANA & EWM
- ERP‑Side Settings for EWM Integration
- EWM‑Side Settings & Warehouse Setup
- Stock Type, Availability Group & Mapping Logic
- ERP → EWM Document Integration Flow
- Extra Steps for Decentralized EWM on S/4HANA
These posts will give you the complete picture of how EWM interacts with S/4HANA behind the scenes — a must‑have foundation for mastering any advanced EWM process.
Image by macrovector on Freepik


