
If you have spent any time in the traditional SAP ERP environment, you are likely intimately familiar with the distinct silos of Transaction Codes like XD01 and XK01. For decades, Vendor and Customer masters lived in separate worlds, often resulting in data redundancy and a fragmented view of a single business entity. In SAP S/4HANA, the “old way” is gone.
The transition to the Business Partner (BP) model is a strategic pivot toward enterprise scalability. In this modern architecture, the Business Partner acts as the Leading Object. Through Customer-Vendor Integration (CVI), the BP API triggers an “Outbound” synchronization to the legacy Customer and Vendor master tables. This ensures that while the system uses a unified entry point, backward compatibility with finance and logistics modules is maintained via a sophisticated data buffer. While CVI configuration is often viewed as a “black box,” it can be mastered in seven logical steps.
1. The Shift: Why Business Partner (BP) is the New Standard
The traditional ERP master data model was built for a simpler time, but it carries three core limitations that stifle modern digital transformation:
• Single Address Constraints: Legacy models could only maintain one primary address, failing to reflect complex, multi-site global organizations.
• Lack of Role Concepts: A single legal entity could not easily be treated as both a customer and a vendor within a single object, leading to reconciliation nightmares.
• No Time-Dependency: There was no native way to manage validity periods for addresses or roles, making historical data auditing difficult.
2. Customer/Vendor Integration (CVI)
--> To use the SAP Business Partner as leading object in SAP S/HANA, the Customer/Vendor Integration (CVI) must be used.

--> The CVI component ensures the synchronization between the Business Partner object and the Customer/Vendor objects
CVI assigns Customer and Vendor master data object to SAP Business Partner object and vice versa as shown in the below diagram.
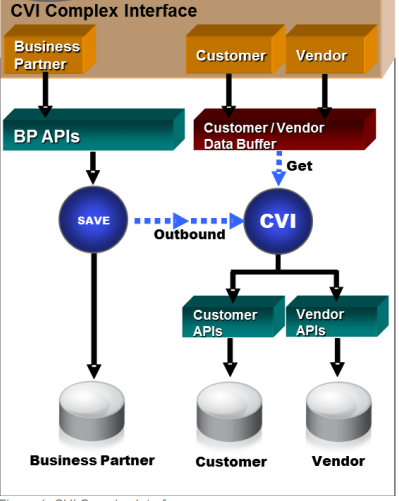
A Business Partner is always created when a Customer or Vendor is created.
2. Phase 0: Pre-requisite Check
Before you touch CVI settings, your foundational organizational structure must be robust. As a senior consultant, I recommend verifying these “Big Four” before starting:
1. Finance Org Structure: Company Codes, Charts of Accounts, and reconciliation GL accounts. Specifically, ensure accounts like 21100000 (Accounts Payable) and 112100000 (PPIN-Receivables Domestic) are created.
2. Sales & Distribution (SD): Define Sales Org PA10, Distribution Channel PA, and Division DC.
3. Material Management (MM): Ensure Purchasing Organizations (e.g., PA10) and Plants are assigned.
4. Logistics Foundation: Shipping points and unloading points must be ready for the BP role assignments.
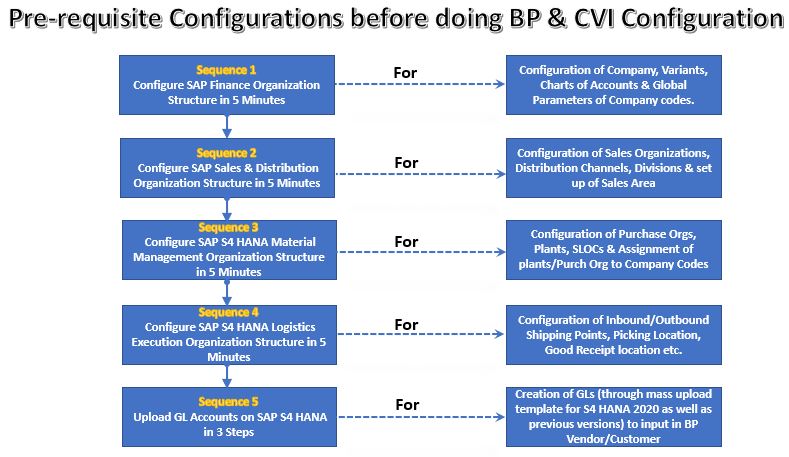
Link to each post is given below
- 1. Configure SAP Finance Organization Structure in 5 Minutes
- 2. Configure SAP Sales & Distribution Organization Structure in 5 Minutes
- 3. Configure SAP S4 HANA Material Management Organization Structure in 5 Minutes
- 4. Configure SAP S4 HANA Logistics Execution Organization Structure in 5 Minutes
- 5. Upload GL Accounts on SAP S4 HANA in 3 Steps
3. How to configure BP (Business Partners) and CVI (Customer-Vendor Integration) in 7 Steps
Time needed: 10 minutes
How to Configure S4HANA Business Partner – Customer-Vendor Integration in 7 Easy Steps
- Step 1 – Define Account Group
Define Account Groups For Customers & Vendors
- Step 2 – Create Number Ranges
Create Number Ranges for Customer Accounts & Vendor Accounts
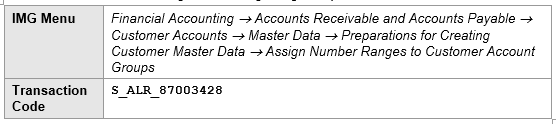
- Step 3 – Assign Number Ranges
Assign Number Ranges to Customer & Vendor Account Groups
- Step 4 – BP Number Range Creation
Define Number Range for Business Partners
- Step 5 – Assign BP Number Ranges
Define BP Grouping & Assign Number Range
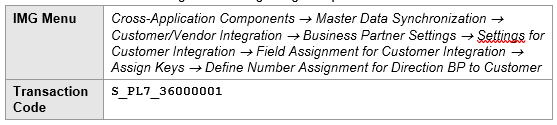
- Step 6 – Number Assignment
Number Assignment for Direction BP to Customer & BP to Vendor
- Step 7 – Create your first BP in S4 HANA
Create your first BP representing Vendor in S4 HANA
Create your first BP representing Customer in S4 HANA
Step 1: Architecting Your Account Groups
Account groups differentiate your business entities (e.g., Domestic, Export, Service, or One-time). You must define these for both directions.
Note : To read more about the account group in the reference of Business partner in S4 HANA, you can read HERE on SAP Help
1.1 Define Account Groups For Customers
Here we will Define Account Groups For Customers.
Follow the below path
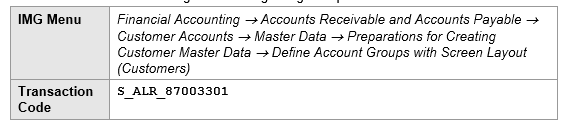
We have defined account group “CUST” for our customers

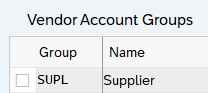
1.2 Define Account Groups For Vendors
Here we will Define Account Groups For Vendors.
Follow the below path

We have defined account group “SUPL” for our customers
Step 2: Establishing Number Ranges
Every master record requires a unique ID. In most high-integrity implementations, we define a range (e.g., “ZP”) that covers the breadth of the expected master data volume.
2.1 Create Number Ranges for Customer Accounts
Follow the below path to Create Number Ranges for Customer Accounts

Configure the Customers number ranges as given in the below screenshot

2.2 Create Number Ranges for Vendor Accounts
Follow the below path to Create Number Ranges for Vendor Accounts

Configure the Customers number ranges as given in the below screenshot
Step 3: Linking Ranges to Account Groups
Now, assign the number ranges to your account groups. For instance, assign number range “ZP” to your “CUST” and “SUPL” groups. This creates the technical “bucket” where your legacy-side data will reside after the CVI synchronization.
3.1 Assign Number Ranges to Customer Account Groups
Follow the below path to Assign Number Ranges to Customer Account Groups
Assign the number range “ZP” to the customer account group “CUST”

3.2 Assign Number Ranges to Vendor Account Groups
Assign the number range “ZP” to the customer account group “SUPL”

Step 4 :Define Number Range for Business Partners
This is a separate configuration for the Business Partner object itself. Access this via T-Code BUCF.
Senior Consultant’s Pro-Tip: While S/4HANA allows different numbers for a BP and its associated Customer/Vendor, failing to keep these numbers identical is the #1 cause of end-user confusion. Ensure your BP number range matches your Customer/Vendor ranges to streamline User Acceptance Testing (UAT).

To keep the number range between BP & Vendor as well as BP & Customer , create the same number range for BP as we did for Account Group “CUST” & “SUPL”

Step 5: The Critical Link -Grouping & Assignment
In this step, you define the BP Grouping and assign the number range. This determines whether the BP number is assigned internally by the system or externally.
External Standard Grouping radio button must be selected. Here we
must assign the number range which is used for your actual Customer numbers (which is assigned to the Customer account group).


5.1 Troubleshooting SAP S/4HANA BP Synchronization Errors
Please note that you might receive an Runtime system dump “DYNP_TOO_MANY_RADIOBUTTONS_ON” when defining groupings and assigning number ranges for Business Partner number.
a)-Reason of the Error
Only one of the field should be set to radio button as “X” In a group of radio buttons. If multiple radio buttons of the group are set at the same time. This error causes the application to terminate and results in a short dump
b)-Resolution
To resolve the error run the report “BDT_CORR_003”
Step 6: Directional Synchronization (CVI Settings)
This is the heart of CVI configuration. You are telling the system how to map the Business Partner to the legacy tables.
This mapping ensures that when you hit “Save” on a Business Partner, the “Outbound” synchronization successfully populates the KNA1 (Customer) or LFA1 (Vendor) tables
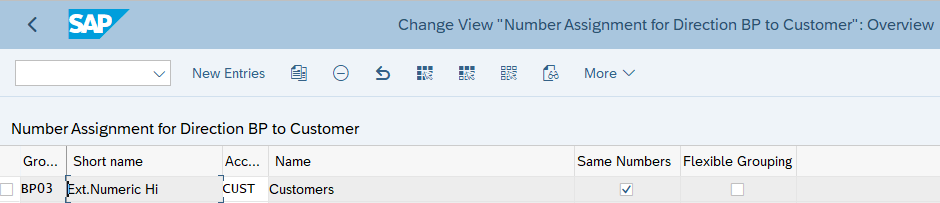
6.1 Number Assignment for Direction BP to Customer
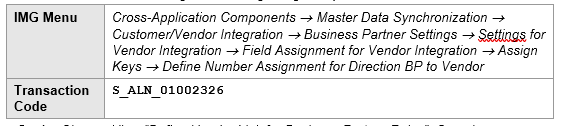
6.2 Number Assignment for Direction BP to Vendor

Step 7 :Now Create Our First BP Vendor & First BP Customer
All configuration related to BP & CVI integration is done now. We will create our first BP Vendor & BP Customer now.
7.1 Creation of First BP Vendor
Start Transaction “BP”
7.1.1 Creation of Role “000000 Business Partner (Gen.)”
Input the name of BP vendor you want to create & click on Create organization as shown in below
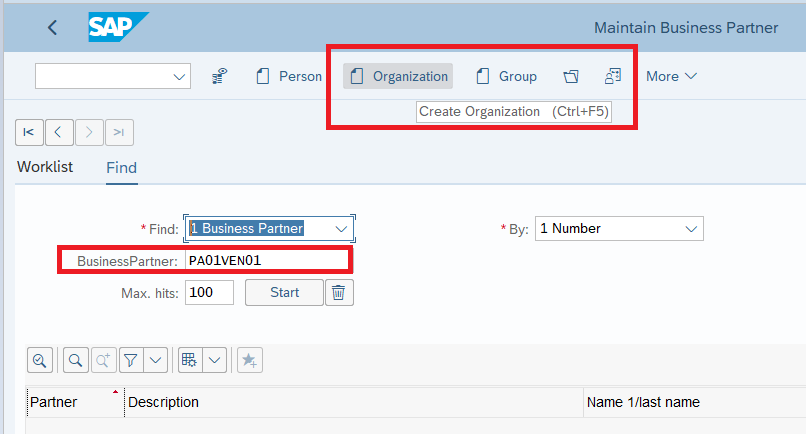
fill out address and other details like language
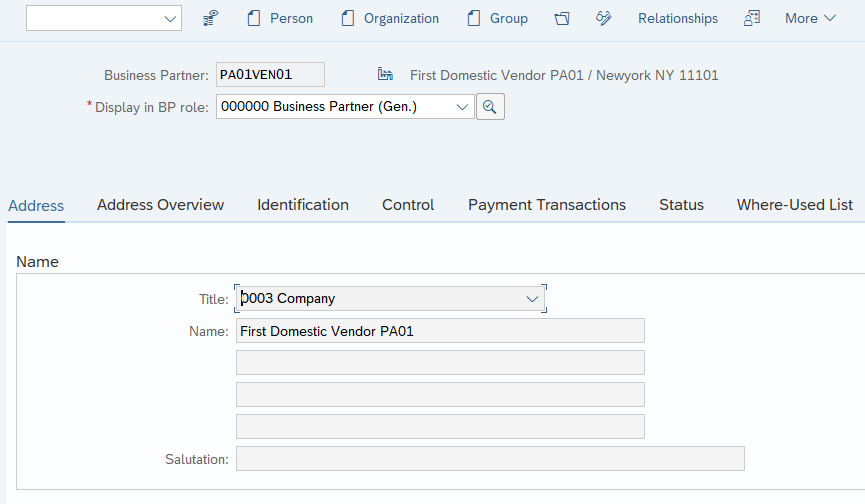
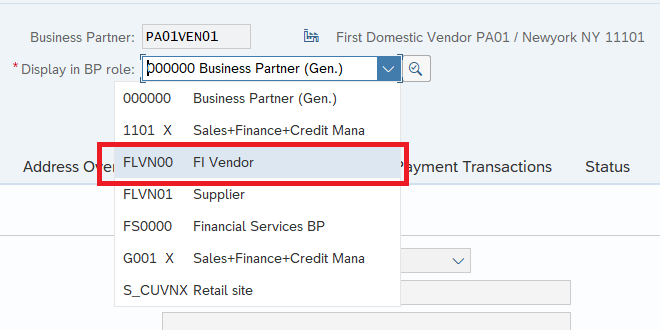
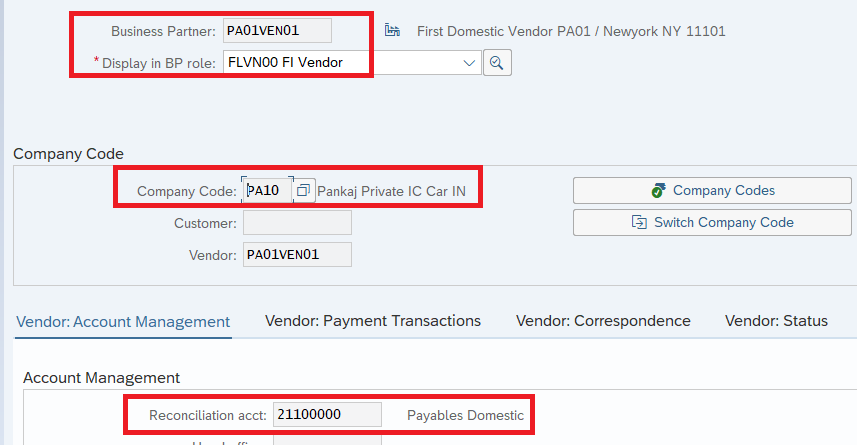
7.1.2 Creation of Role “FLVN00 – FI Vendor”
Now from the dropdown in “Display in BP role” select role “FLVN00 – FI Vendor”
Input reconciliation account 21100000 (Pick from the downloaded GL Account master from above)
You can create GL 21100000 manually also.
Please check HERE to see details of this GL 21100000 creation step by step
7.1.3 Creation of Role “FLVN01 – Supplier”
Now from the dropdown in “Display in BP role” select role “FLVN01 – Supplier”
This will create our vendor in our Purchasing organization “PA10”

We have created our first vendor PA01VEN01 successfully !!
7.2 BP as “Default Party Entitled to Dispose” for Embedded & Decentralized S4 HANA
We have to create a BP with plant assigned to it to declare it as default part entitled to dispose in embedded EWM.
--> For Embedded EWM creation of BP with plant assigned to it is enough to declare this BP as Default Part Entitled to Dispose

--> For Decentralized S4 HANA, in addition to the creating of a vendor with plant assigned to this vendor, We need to assign this BP to the plant in the table /SCWM/TMAPPLANT is used (View /SCWM/VTMAPPLANT)

Please check below post for detail

Configure EWM in S/4 HANA
Now we will declare our BP as “Default Party Entitled to dispose” for plant PA10/EWM WM PA11 (check post Configure EWM in S/4 HANA for details)
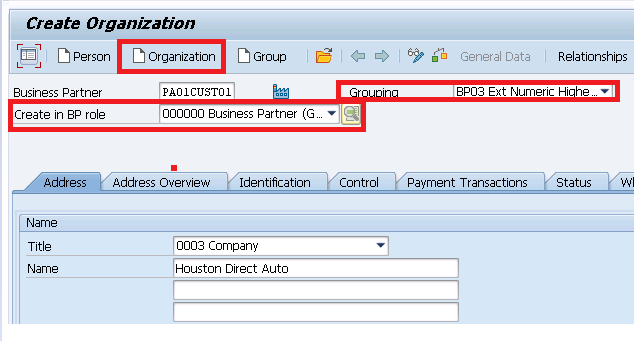
7.3 Creation of First BP Customer
Start Transaction “BP”
Input the name of BP vendor you want to create & click on Create organization as shown in below
7.3.1 Creation of Role “000000 Business Partner (Gen.)”
Customer Name is PA01CUST01 – “Houston Direct Auto”
Select Material Group as “BP03”
First Create General Role “000000 Business Partner (Gen.)”
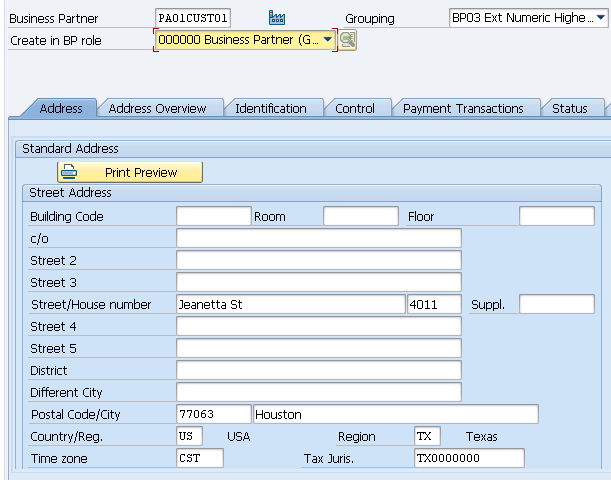
Input address details like – street number, post code city , region etc. as shown in the below screenshot
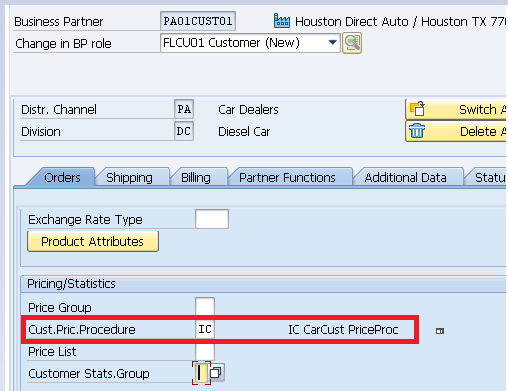
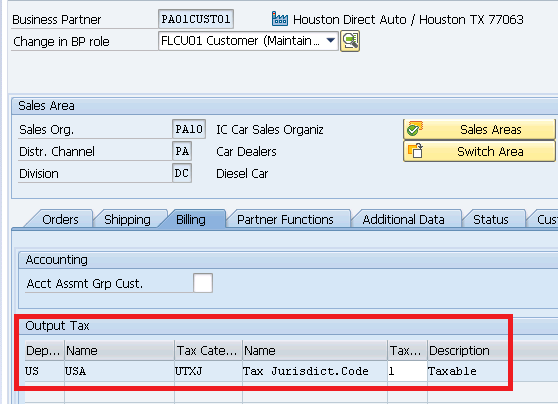
7.3.2 Creation of Role ” FLCU01 Customer ”
Now in the drop down choose the role as “FLCU01 Customer” and click on sales & distribution
Input the below values
Sales Org. as “PA10-IC Car Sales Organi”
Distr. Channel as “PA-Car Dealers”
Division as “DC-Diesel Car”

In the “order” tab input as
Cust.Pric.Procedure as “IC-IC CarCust PriceP”
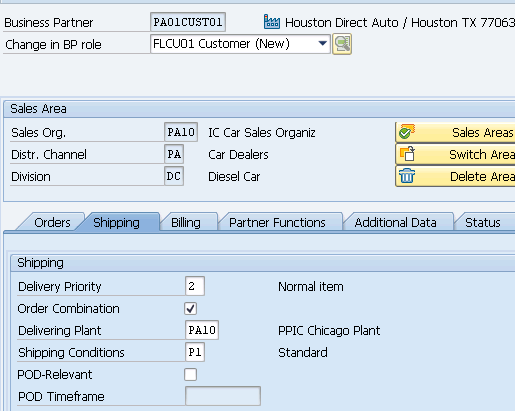
In the “Shipping” tab input the values
- Delivery Priority as “2-Normal”
- Delivering Plant as “PA10-PPIC C”
- Shipping Conditions as “P1-Standard”
In the “Billing” tab input the values
- Tax classification for customer as “1-Liable for Taxes”
- Acct Assmt Grp Cust. as “01-Domestic Revenue”
save the entries
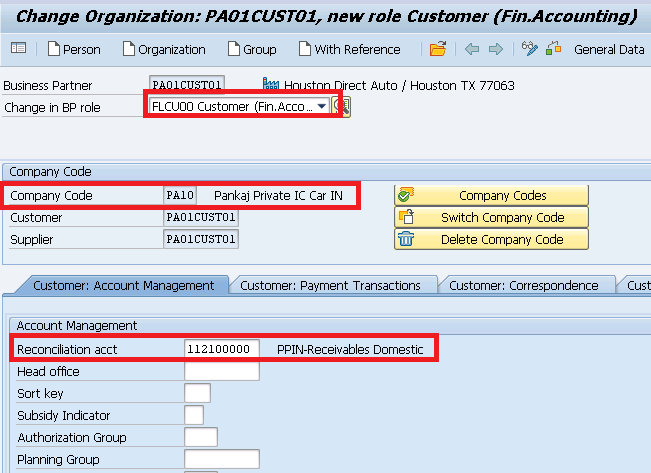
7.3.3 Creation of Role ” FLCU00 Customer ”
Now in the drop down choose the role as “FLCU01 Customer” and click on sales & distribution
Input the reconciliation account 112100000 -“PPIN-Receivables Domestic” as created HERE
7.4 Creation of BP Vendor for Vendor Consignment
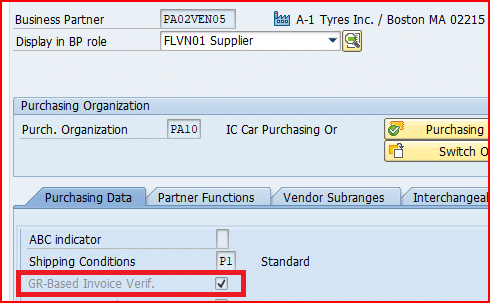
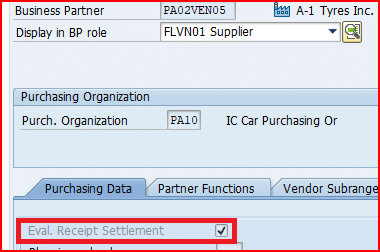
For Vendor consignment, our vendor BP should have the below important values
Please note that above requirements are only for the role FLVN01. The rest of the BP vendor creation process is same as explained HERE
Note : Please check the below post to check step by step configuration of the Consignment process in detail
SAP Consignment: Configuration Guide and Process Overview
7.4.1 Creation of Role “FLVN01 – Supplier”
Below highlighted fields are required to use the BP in the vendor consignment process
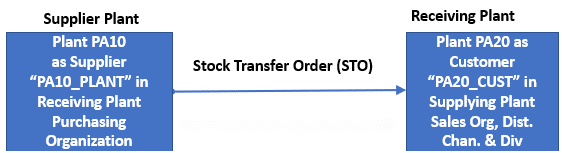
7.5 Creation of BP Customer & Supplier for STO with Delivery Scenario
For the scenario STO with delivery scenario
- Suppling Plant should be created as supplier in the receiving plant purchasing organization
- Receiving plant should be created as customer in the sending plant sales organization & distribution channel.
📘 Master SAP Stock Transfer
Want to understand every SAP stock transfer scenario? Explore the complete 2‑Branch, 9‑Scenario SAP Stock Transfer Master Series covering MIGO, STO, delivery, billing, LIV, accounting, and pricing.
7.5.1 Creation of BP Supplier for STO with Delivery Scenario
We will create plant PA10 as Supplier “PA10_PLANT” in the receiving plant purchasing organization “PA10”
Start BP and create general data inputting plant address etc.
Now create FLVN01 Supplier role and select “Vendor -General Data” tab and input plant “PA10” here
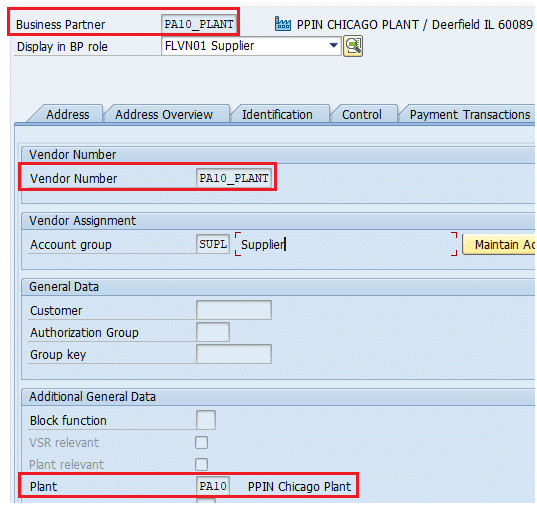
Now create rest of the Vendor roles as explained in the heading Creation of First BP Vendor
7.5.2 Creation of BP Customer for STO with Delivery Scenario
Here |material is supplied to plant PA20 so plant PA20 is customer.
--> Plant PA20 will be represented as customer "PA20_CUST" in the supplying plant Sales Organization "PA10", Distribution Channel "PA" & Division "DC""
Create this Customer as explained in the section Creation of First BP Customer
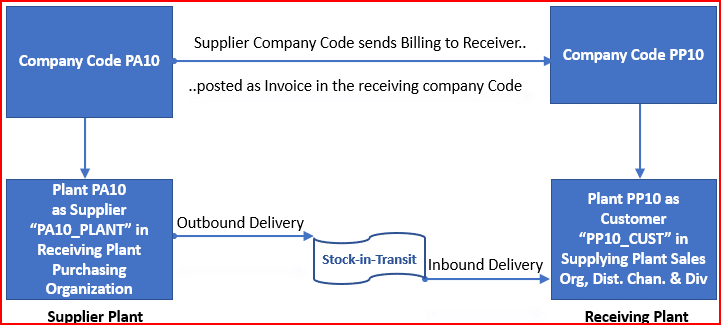
7.6 Creation of BP Customer & Supplier for Inter-Company STO with Delivery & Billing Scenario
This scenario is inter-company scenario so we are taking receiving plant as PP10 which belongs to the different company code PP10.
- Suppling Plant should be created as supplier in the receiving plant purchasing organization
- Receiving plant should be created as customer in the sending plant sales organization & distribution channel.
Please check the below post for the details of configuration & testing of SAP Intercompany STO Process with Delivery & Billing
How to Configure SAP Intercompany STO Process with Delivery & Billing
7.6.1 Creation of BP Supplier for Inter-Company STO with Delivery & Billing
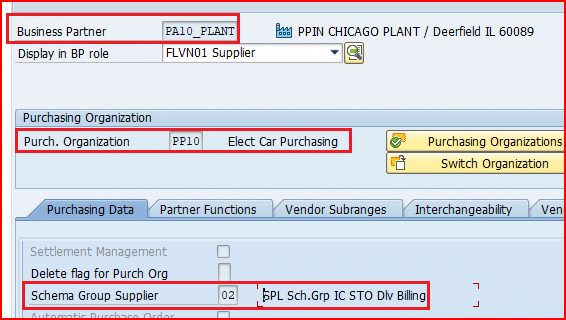
We will create plant PA10 as Supplier “PA10_PLANT” in the receiving plant purchasing organization “PP10”
Start BP and create general data inputting plant address etc.
Now create FLVN01 Supplier role and select “Vendor -General Data” tab and input plant “PP10” here
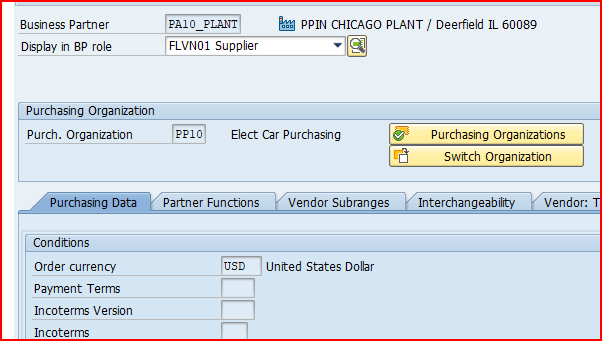
Now create rest of the Vendor roles as explained in the heading Creation of First BP Vendor
Input the Schema group supplier as “02” -SPL Sch.Grp IC STO Dlv Billing, in order to determine the pricing schema correctly as explained in the below post
Ultimate guide to SAP S4 HANA MM Pricing Procedure- Define Schema Determination for Inter-company STO Process with Delivery & Billing
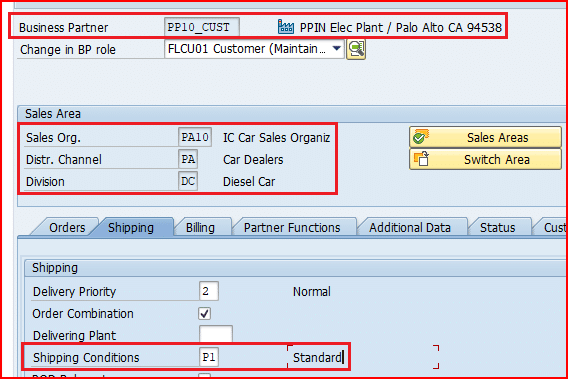
7.6.2 Creation of BP Customer for Inter-Company STO with Delivery & Billing
Here material is supplied to plant PP10 so plant PP10 is customer.
--> Plant PP10 will be represented as customer "PP10_CUST" in the supplying plant Sales Organization "PA10", Distribution Channel "PA" & Division "DC""
Please note that it is crucial to input correct value of “Customer pricing Procedure” in order to determine the correct Pricing Procedure in Inter-company STO billing
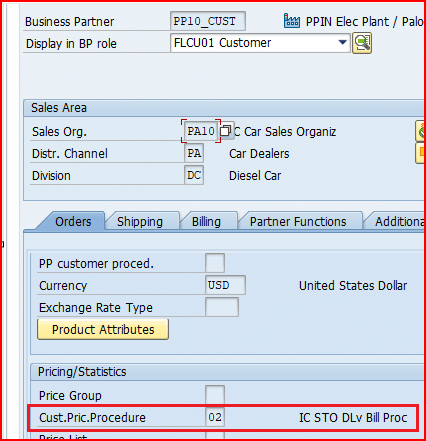
Please see the below post for the details on creation of “Customer Pricing Procedure” & Usage of the same in determining the correct pricing procedure
The Ultimate SAP S4 HANA Sales Pricing Guide with FAQ – Document Pricing Procedure
Create this Customer as explained in the section Creation of First BP Customer
📘 Master SAP Stock Transfer
Want to understand every SAP stock transfer scenario? Explore the complete 2‑Branch, 9‑Scenario SAP Stock Transfer Master Series covering MIGO, STO, delivery, billing, LIV, accounting, and pricing.
FAQ : CVI – Customer Vendor Integration
No, a BP can have its own number since it is an independent object. A BP is related to a vendor through the table CVI_VEND_LINK, and related to a customer through the table CVI_CUST_LINK. Therefore, the BP linked to a Customer/vendor do not need to have the same number.
SAP recommends creating one BP per each legal entity, and adding Roles for the different business functions used to interact with the company. However, it is not mandatory.
From a functionality perspective there is no change. Partner function in S/4HANA works the same way as it does in SAP ERP. In BP transaction in S/4HANA, if you go to the Partner function tab you will find an additional column called “Assigned BP”. This column displays the BP number of the Vendor or Customer assigned to the Partner Function.
Courtesy : SAP Note 2713963
Image Courtesy : Flat vector created by freepik – www.freepik.com